
Tinkering with Tasmota sensors
-
Quite a number of years ago I set up a few Arduino sensors that reported temperature to my VeraLite running UI5. I did this with MySensors, a quite nice community based platform.
I discontinued this mostly because that the combination of a rather flaky Vera and that the Vera when rebooting lost the USB connected gateway.Some time ago I started to look at this again, but this time using ESP8266’s and Tasmota. I think the credit for this partially is the plugin for Shelly and Tasmota that @therealdb has written, even though I have still to use the plugin. The other reason for reentering into this area is that my electrical supplier is replacing the electrical meters for a new smart meter. Today I use a blink meter from Effergy, but the new meter will have a port for reading out data. This also led me to Tasmota, there seems to be a functioning solution for this.
I must say that Tasmota is brilliant! Support for all kind of devices and sensors and super easy to use, also for multi-sensors, OTA update, good documentation etc. You can get parts on ebay etc quite cheap. It has also so far been very stable. You can also very easily adjust the sensors readout, e.g. TempOffset -1.5 gives an offset of -1.5 degrees.
I have put together sensors for temperature and humidity for use in the garage, the outhouse, on the attic etc. I have tested DHT22, DS1820B, BME280 and BH1750 so far and they all work without issues. The latter two I installed in an outdoor enclosure to use as a simple weather station reporting temperature, humidity, air pressure and light level.
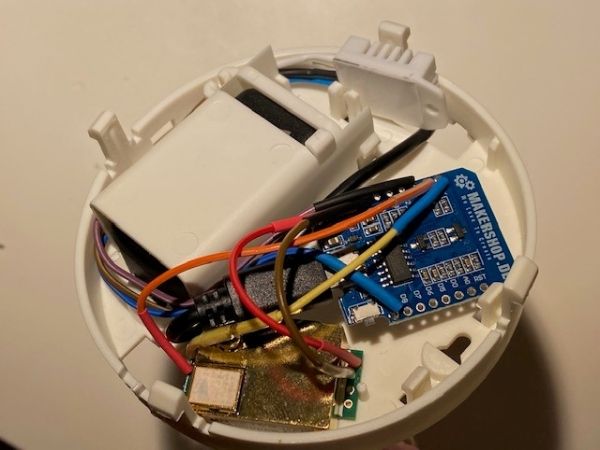
I also got a MH-Z19B CO2 meter for testing to monitor the indoor CO2 levels. The initial feeling is that it does what it should.
In general I have pretty good wifi coverage with a few Unifi access points. One of the sensors is in a building some 25 meters from the house where the wifi is not that strong, but the NodeMCU has no problem with this. Quite impressive and a good addition to Z-wave for that kind of location.
Not owning a 3D printer I have had to resort to purchased enclosures and the old Dremel.

For the CO2 sensor I put it in an old smoke detector enclosure for now.
I am sure that there are a lot of talent here that can do much better with a 3D printer!
You can get the data from the Tasmota devices into OpenLuup in a number of ways. The obvious way is via MQTT. I have still to set this up at some point in time. The second way is to use the excellent SiteSensor plugin. I tested this but had some problems with reporting stopping after a few days for some reason. I probably got something wrong in the setup. The third option, that I currently use is via adding rules to each sensor. You can quite easily add rules for reporting data to a virtual sensor in OpenLuup, e.g:
Rule1 ON tele-AM2301#Temperature DO Var1 %value% ENDON ON tele-AM2301#Temperature DO WebSend [IP_adress:3480]/data_request?id=lu_action&DeviceNum=65&id=variableset&serviceId=urn:upnp-org:serviceId:TemperatureSensor1&Variable=CurrentTemperature&Value=%Var1% ENDONWith TelePeriod you can change the polling interval as required.
This method I think could be super useful for reporting back e.g. switch status from a Tasmota node much like I understand Shelly can do.
Some resources and notes I made on the way:
-
Using Tazmotizer to flash the ESP’s is very easy
-
List of supported sensors including how to connect, commands etc
-
A good pinout reference for ESP8266 variants
-
Tasmota rules documentation
-
Most sensors are either “Generic (0)” or “Generic (18)”, check for each sensor type what to use
-
For I2C sensors e.g. BME280 one must use tasmota-sensors.bin
-
For the MH-Z19B I had to flash the ESP before attaching the sensor, this could be a good practice always
-
Use the following url for the query in SiteSensor:
http://IP_address/cm?cmnd=Status%2010
This became a rather long post but hopefully it can be of some use.
//ArcherS -
-
I'm struggling with good enclosure as well (I still have to find something good for my light and temperature sensor...), but overall I did what you did, plus MQTT, because I'm not that good with Tasmota's rules and I have a couple of other things running on MQTT (Shelly, OpenSprinkler, FullyKiosk) and it was fun to write an orchestrator from MQTT to luup.
Do you mind if I grab some of your instructions and add them to the readme? A lot of people are asking for guidance and the rules in particular is very helpful
")
-
I'm struggling with good enclosure as well (I still have to find something good for my light and temperature sensor...), but overall I did what you did, plus MQTT, because I'm not that good with Tasmota's rules and I have a couple of other things running on MQTT (Shelly, OpenSprinkler, FullyKiosk) and it was fun to write an orchestrator from MQTT to luup.
Do you mind if I grab some of your instructions and add them to the readme? A lot of people are asking for guidance and the rules in particular is very helpful
@therealdb feel free to use what ever you want to your instructions, nice to know that it will be of use for others.
//Archers
-
@therealdb feel free to use what ever you want to your instructions, nice to know that it will be of use for others.
//Archers
@therealdb I built my outdoor sensor from what I had in the garage, very much DIY in other words.
I used an outdoor junction box, to this I hot glued a plastic dome from an old motion sensor for the light sensor. I also added a short piece of plastic pipe for the BME280 so that it is outside of the box to get better readings. To keep spiders etc out of the pipe I added an old stainless mesh dome to the end of it.
In the box is also a 240V/5V transformer.The intention is to mount it on the north wall of the house outside of the sun. At the moment it is laying on the window sill.
Some more small tips on rules:
It is possible to create up to three rules for each sensor.
It is possible to have several "Do" stamements in each rule.
Rule<x> ON <trigger1> DO <command> ENDON ON <trigger2> DO <command> ENDON ...It is very easy to find out the name of each sensor for using in the rules by looking at:
http://IP_address/cm?cmnd=Status%2010A rule is defined by pasting the rule from e.g. notepad to the Console window of the sensor.
After that the rule needs to be enabled byRule1 1,Rule2 1etc.
After enabling a rule check in the console that the rule is sending values.
A rule is deactivated byRule1 0etc.
To see the contents of a rule just typeRule1etc.
To delete a rule typeRule1 "etc.My recommendation is for people to look at the Tasmota rules documentation, it is very good.
.
//ArcherS -
I'm currently struggling to get some dome, so sensors are getting dust. It's not a huge problem, since I have them indoor at the moment, but I wish I had more leftovers to thinker with
Thanks for the rules, I'll definitely add something to the docs in the next days.
-
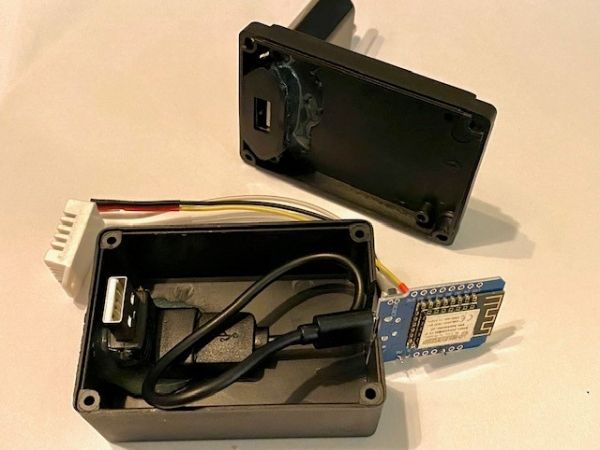
Continuing an old thread, today I finished a Tasmota IR receiver and transmitter. I built it using the guidelines in the Tasmota documentation.
 It is built from a Wemos Mini D1and some components for in total approx. €10. All soldered together and hot-glued into a 60x60mm encosure.
I must say it works quite nicely, I have tried it with a few of the remotes in the household and it seems to pick up and decode them so far.Like all Tasmota devices it can be controlled via console, MQTT or web requests.
Via web requests you send:http://DeviceIPadress/cm?cmnd=and then append the command e.g. IRsend{...} or IRHVAC{...}.
The command needs to be url encoded via e.g. https://www.urlencoder.org/
The exact command you get by the help of the IR receiver, just press the appropriate button on the remote and look at the response in the console.The idea I have with the IR unit is to be able to send some commands to the HVAC. Commands for HVAC units are a bit tricky since the remote usually send all config commands every time, but I think I got it to work as I need to.
I could also see this as an alternative to a Broadlink unit to control a TV etc. as well, all depending on the use case.//ArcherS
-
Continuing an old thread, today I finished a Tasmota IR receiver and transmitter. I built it using the guidelines in the Tasmota documentation.
It is built from a Wemos Mini D1and some components for in total approx. €10. All soldered together and hot-glued into a 60x60mm encosure.
I must say it works quite nicely, I have tried it with a few of the remotes in the household and it seems to pick up and decode them so far.Like all Tasmota devices it can be controlled via console, MQTT or web requests.
Via web requests you send:http://DeviceIPadress/cm?cmnd=and then append the command e.g. IRsend{...} or IRHVAC{...}.
The command needs to be url encoded via e.g. https://www.urlencoder.org/
The exact command you get by the help of the IR receiver, just press the appropriate button on the remote and look at the response in the console.The idea I have with the IR unit is to be able to send some commands to the HVAC. Commands for HVAC units are a bit tricky since the remote usually send all config commands every time, but I think I got it to work as I need to.
I could also see this as an alternative to a Broadlink unit to control a TV etc. as well, all depending on the use case.//ArcherS
I like the Tasmota stuff but the devices would probably become a management nightmare as time goes on, or as the number of devices is increased. However, is it worthwhile me having a look at supporting the Tasmota IR device with this plugin or maybe not?
The Tasmota interface is a bit lacking as it follows no standard. This list
"Protocol" or "Vendor" (select one of the following):
RC5, RC6, NEC, SONY, PANASONIC, JVC, SAMSUNG, WHYNTER, AIWA_RC_T501, LG, MITSUBISHI, DISH, SHARP, DENON, SHERWOOD, RCMM, SANYO_LC7461, RC5X, NEC (non-strict), NIKAI, MAGIQUEST, LASERTAG, CARRIER_AC, MITSUBISHI2, HITACHI_AC1, HITACHI_AC2, GICABLE, LUTRON, PIONEER, LG2, SAMSUNG36, LEGOPF, INAX, DAIKIN152
includes duplicates, as some such as LG, are based on NEC format. Formats have already been well defined here.
Also listing out working codes like this will become untenable in the long term. It's already been done here.
Perhaps the Virtual Pronto Remote plugin could also produce raw "Tasmota" codes, so they could be used through this Tasmota interface?
I don't have the hardware, so can't test it. Might also have to rename the plugin as it will do output more than pronto codes.
It would be easier to encourage the Tasmota people to allow Pronto codes to be sent, which is an extremely popular format?
-
I like the Tasmota stuff but the devices would probably become a management nightmare as time goes on, or as the number of devices is increased. However, is it worthwhile me having a look at supporting the Tasmota IR device with this plugin or maybe not?
The Tasmota interface is a bit lacking as it follows no standard. This list
"Protocol" or "Vendor" (select one of the following):
RC5, RC6, NEC, SONY, PANASONIC, JVC, SAMSUNG, WHYNTER, AIWA_RC_T501, LG, MITSUBISHI, DISH, SHARP, DENON, SHERWOOD, RCMM, SANYO_LC7461, RC5X, NEC (non-strict), NIKAI, MAGIQUEST, LASERTAG, CARRIER_AC, MITSUBISHI2, HITACHI_AC1, HITACHI_AC2, GICABLE, LUTRON, PIONEER, LG2, SAMSUNG36, LEGOPF, INAX, DAIKIN152
includes duplicates, as some such as LG, are based on NEC format. Formats have already been well defined here.
Also listing out working codes like this will become untenable in the long term. It's already been done here.
Perhaps the Virtual Pronto Remote plugin could also produce raw "Tasmota" codes, so they could be used through this Tasmota interface?
I don't have the hardware, so can't test it. Might also have to rename the plugin as it will do output more than pronto codes.
It would be easier to encourage the Tasmota people to allow Pronto codes to be sent, which is an extremely popular format?
@a-lurker said in Tinkering with Tasmota sensors:
I like the Tasmota stuff but the devices would probably become a management nightmare as time goes on
I still have a sensor stuck at v5, because it's outside near the pool panel and it's a pita to mess with it, and it's working fine. I agree it's more management, but it's doable. I usually update them every now and them, manually, but I saw a couple of programs (this applies to shelly too) to manage them and update firmware centrally.
I still prefer Zwave, but it's too difficult to have reliable sensors for specific cases.
-
Continuing an old thread, today I finished a Tasmota IR receiver and transmitter. I built it using the guidelines in the Tasmota documentation.
It is built from a Wemos Mini D1and some components for in total approx. €10. All soldered together and hot-glued into a 60x60mm encosure.
I must say it works quite nicely, I have tried it with a few of the remotes in the household and it seems to pick up and decode them so far.Like all Tasmota devices it can be controlled via console, MQTT or web requests.
Via web requests you send:http://DeviceIPadress/cm?cmnd=and then append the command e.g. IRsend{...} or IRHVAC{...}.
The command needs to be url encoded via e.g. https://www.urlencoder.org/
The exact command you get by the help of the IR receiver, just press the appropriate button on the remote and look at the response in the console.The idea I have with the IR unit is to be able to send some commands to the HVAC. Commands for HVAC units are a bit tricky since the remote usually send all config commands every time, but I think I got it to work as I need to.
I could also see this as an alternative to a Broadlink unit to control a TV etc. as well, all depending on the use case.//ArcherS
@archers said in Tinkering with Tasmota sensors:
It is built from a Wemos Mini D1and some components for in total approx. €10. All soldered together and hot-glued into a 60x60mm encosure.
Great build! As I already said, I'm jealous of your enclosures. Mine are too wacky

-
@archers said in Tinkering with Tasmota sensors:
It is built from a Wemos Mini D1and some components for in total approx. €10. All soldered together and hot-glued into a 60x60mm encosure.
Great build! As I already said, I'm jealous of your enclosures. Mine are too wacky
@therealdb Thanks!
I did some searching before finding good enclosures, I eventually found a few nice ones at Conrad. They have a lot of different enclosures listed, many of them are not that expensive either. I notice that they also have an Italian branch, below I listed what I used on Conrad.it.//ArcherS
-
I like the Tasmota stuff but the devices would probably become a management nightmare as time goes on, or as the number of devices is increased. However, is it worthwhile me having a look at supporting the Tasmota IR device with this plugin or maybe not?
The Tasmota interface is a bit lacking as it follows no standard. This list
"Protocol" or "Vendor" (select one of the following):
RC5, RC6, NEC, SONY, PANASONIC, JVC, SAMSUNG, WHYNTER, AIWA_RC_T501, LG, MITSUBISHI, DISH, SHARP, DENON, SHERWOOD, RCMM, SANYO_LC7461, RC5X, NEC (non-strict), NIKAI, MAGIQUEST, LASERTAG, CARRIER_AC, MITSUBISHI2, HITACHI_AC1, HITACHI_AC2, GICABLE, LUTRON, PIONEER, LG2, SAMSUNG36, LEGOPF, INAX, DAIKIN152
includes duplicates, as some such as LG, are based on NEC format. Formats have already been well defined here.
Also listing out working codes like this will become untenable in the long term. It's already been done here.
Perhaps the Virtual Pronto Remote plugin could also produce raw "Tasmota" codes, so they could be used through this Tasmota interface?
I don't have the hardware, so can't test it. Might also have to rename the plugin as it will do output more than pronto codes.
It would be easier to encourage the Tasmota people to allow Pronto codes to be sent, which is an extremely popular format?
@a-lurker I am not that good at IR codes to be honest. A number of years ago I played around with a USB UIRT together with my UI5 VeraLite and Girder(?) on a PC. I was able to record some codes that I then could send from the Vera.
I agree that better Tasmota support for Pronto codes probably could be useful since it seems to be a quite popular format and available for a lot of devices. Also the hardware for the device I put together seems both quite capable and reasonable in price. One possible upside with Tasmota is that it does not suffer from the lock-in problems that I have understood that e.g. Broadlink does from time to time when the manufacturers want to keep the users in their cloud.
//ArcherS
-
@a-lurker I am not that good at IR codes to be honest. A number of years ago I played around with a USB UIRT together with my UI5 VeraLite and Girder(?) on a PC. I was able to record some codes that I then could send from the Vera.
I agree that better Tasmota support for Pronto codes probably could be useful since it seems to be a quite popular format and available for a lot of devices. Also the hardware for the device I put together seems both quite capable and reasonable in price. One possible upside with Tasmota is that it does not suffer from the lock-in problems that I have understood that e.g. Broadlink does from time to time when the manufacturers want to keep the users in their cloud.
//ArcherS
@archers said in Tinkering with Tasmota sensors:
One possible upside with Tasmota is that it does not suffer from the lock-in problems that I have understood that e.g. Broadlink does from time to time when the manufacturers want to keep the users in their cloud
Yes - it's a problem and your solution is a good Broadlink replacement for IR. Tosmota also has a very capable IR send library, including some excellent Aircon drivers. The library that's being used, can send Pronto as well, so I'm unsure why it's not made available. May be it is but just not documented. It can also do Global Caché. Would be good to ask the question on that forum.
void sendPronto(uint16_t data[], uint16_t len, uint16_t repeat = kNoRepeat);
void sendGC(uint16_t buf[], uint16_t len);
void sendRaw(const uint16_t buf[], const uint16_t len, const uint16_t hz);
If you post some pronto codes that you know definitely work on your AV device/s (NOT aircons) and you say what they do and what manufacturer and type of device eg TV, DVD, etc than I could have a look supporting Tasmota IR. Assuming you are in position to test the result.
Learned codes are OK but you need to learn every single one of interest, which is a pain. If the codes are generated you can use what's already known.
It's just a matter of identifying the correct code set and using the associated pronto codes. Hope this makes some sense.
-
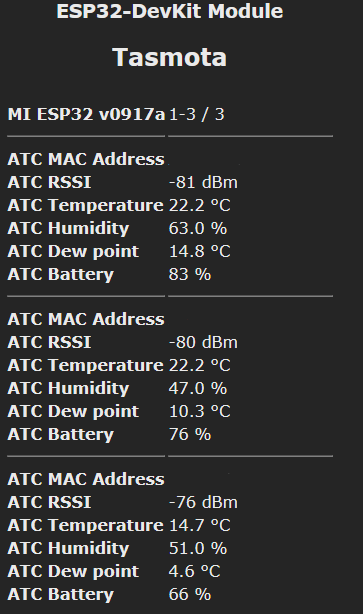
Some time ago I stumbled on some rather nice looking temperature and humidity sensors from Xiaomi and how to get them to communicate with a Tasmota ESP32 with BLE.
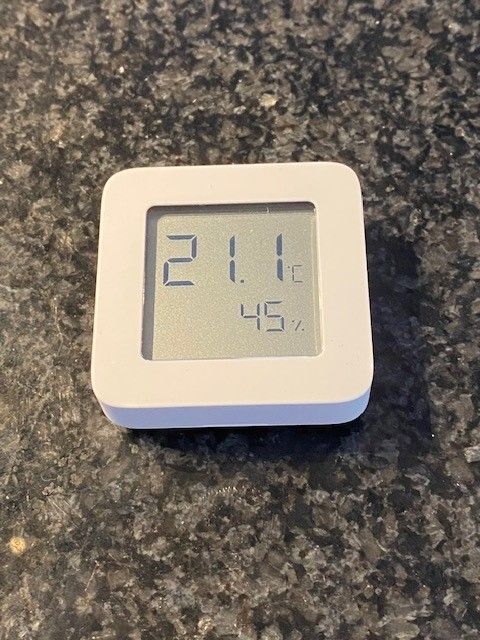
I ordered an ESP32 on Ebay and a three-pack of the sensors from Bangood. The sensors are quite cheap, you can find them for €4-5 in the usual sites.
The sensors are quite small, approx 4.5cm and run on a CR2032 battery. Time will tell how long the batteries will last. With the custom firmware you can change the reporting interval.
I have now been running this for little over two months and it works surprisingly well, bringing the temperature and humidity data into OpenLuup.
In short what you do is the following:
-
Download the beta Tasmota for ESP32, flashing is a bit different from the regular Tasmota but pretty straight forward
-
Enable bluetooth with
setoption115 1 -
The Xiaomi sensors can used both with stock firmware and flashed with a custom firmware that removes the encryption from the transmit of data, I flashed them with a Win10 laptop and it was super easy. You can even roll back the original firmware if you want.
The Xiaomi sensors will then be included by the ESP32 Tasmota device and can be sent to OpenLuup with rules, brought in with Sitesensor or now via MQTT.
-
-
@buxton yes it opens up new possibilities. On the Tasmota bluetooth webpage some other devices are listed, e.g. a soil humidity meter.
So far it has been quite stable for more than two months.
The Tasmota ESP32 is still beta, I assume it will get better over time.I will also make the ESP32 to report over Mqtt now that OpenLuup has support for it, hopefully that will make the setup even more stable.
@archers i didn't want to use a development kit for this, as in my environment they tend to get broken. So went searching and found the Sonoff Dual R3 with an ESP32 chip. Fits nicely in a switch box and runs on mains power. Can't wait to see what kind distance I get as soil sensors are next up after temp sensors.
-
@archers i didn't want to use a development kit for this, as in my environment they tend to get broken. So went searching and found the Sonoff Dual R3 with an ESP32 chip. Fits nicely in a switch box and runs on mains power. Can't wait to see what kind distance I get as soil sensors are next up after temp sensors.
@buxton yes I saw the Sonoff Dual R3, looks like a nice solution for getting an ESP32 into the house. The one downside is that some soldering is needed to get Tasmota onboard. I saw a good clip on this on youtube, should not be too complicated.
The distance for me is quite ok 7-8 meters with some walls inbetween, but it probably varies depending on what walls you have etc.
-
@buxton yes I saw the Sonoff Dual R3, looks like a nice solution for getting an ESP32 into the house. The one downside is that some soldering is needed to get Tasmota onboard. I saw a good clip on this on youtube, should not be too complicated.
The distance for me is quite ok 7-8 meters with some walls inbetween, but it probably varies depending on what walls you have etc.
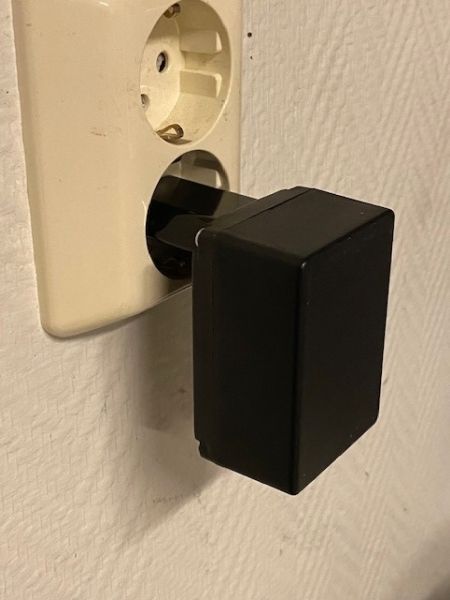
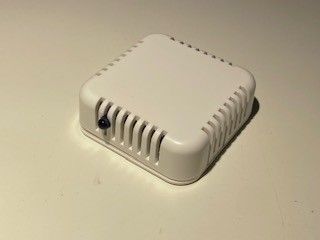
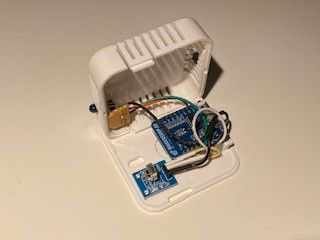
I have now completed two more CO2 meters. I used a similar enclosure as for the IR tranceiver, but this time 80 x 80 mm. I got it from Conrad, but you can get it from e.g. Farnell also. The enclosure is available in black and grey also.
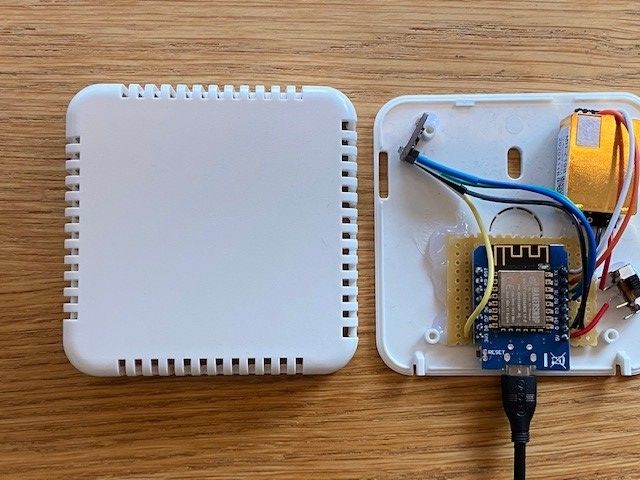
The sensor contains a D1 Mini ESP8266, a MH-Z19B CO2 sensor and a BME280 temp/humidity/air pressure sensor. I have found the BME280 to be pretty good.
The temp reading from the MH-Z19B is however completely off so a separate sensor is required.A tip is to add a switch for the power to the MH-Z19B, this is needed for switching the MH-Z19B off when (re)flashing the ESP.
I think the MH-Z19B requires too much power from the PC USB when flashing.Another tip is that in Tasmota it is possible to adjust the sensor offset with TempOffset and HumOffset.
There are a few options for the MH-Z19B with the Sensor15 command. I have turned off auto calibration.
The plan is to push the data into OpenLuup from the sensors with Mqtt when I get this fully up and running.
-
I have now completed two more CO2 meters. I used a similar enclosure as for the IR tranceiver, but this time 80 x 80 mm. I got it from Conrad, but you can get it from e.g. Farnell also. The enclosure is available in black and grey also.
The sensor contains a D1 Mini ESP8266, a MH-Z19B CO2 sensor and a BME280 temp/humidity/air pressure sensor. I have found the BME280 to be pretty good.
The temp reading from the MH-Z19B is however completely off so a separate sensor is required.A tip is to add a switch for the power to the MH-Z19B, this is needed for switching the MH-Z19B off when (re)flashing the ESP.
I think the MH-Z19B requires too much power from the PC USB when flashing.Another tip is that in Tasmota it is possible to adjust the sensor offset with TempOffset and HumOffset.
There are a few options for the MH-Z19B with the Sensor15 command. I have turned off auto calibration.
The plan is to push the data into OpenLuup from the sensors with Mqtt when I get this fully up and running.