-
Hi folks
Hope you're all keeping well.
Working as we are in lockdown has shown some issues in the heating of our house. Basically we have a Horstmann SRT321 in the Hallway with its partner connected to the boiler. That bit all works wonderfully.
Problem is when I'm up in the office, it gets a bit chill unless I turn the the Secure in the hallway up. But then the rest of the house get OTT.
So I thought perhaps I could fit TRVs to all the rads (probably a good idea anyway) but unless I'm wrong, unless the SRT321 has a call for heat, there's going to be no hot water for the rads when the TRV opens.
So I'm still cold.
Can I associate each of the TRVs to the boiler control (in the same way the SRT321 is) and get a call for heat directly, or am I going to have to do this programatically.
Or am I completely wrong in how to approach this?TIA
C
-
Quite a number of years ago I set up a few Arduino sensors that reported temperature to my VeraLite running UI5. I did this with MySensors, a quite nice community based platform.
I discontinued this mostly because that the combination of a rather flaky Vera and that the Vera when rebooting lost the USB connected gateway.Some time ago I started to look at this again, but this time using ESP8266’s and Tasmota. I think the credit for this partially is the plugin for Shelly and Tasmota that @therealdb has written, even though I have still to use the plugin. The other reason for reentering into this area is that my electrical supplier is replacing the electrical meters for a new smart meter. Today I use a blink meter from Effergy, but the new meter will have a port for reading out data. This also led me to Tasmota, there seems to be a functioning solution for this.
I must say that Tasmota is brilliant! Support for all kind of devices and sensors and super easy to use, also for multi-sensors, OTA update, good documentation etc. You can get parts on ebay etc quite cheap. It has also so far been very stable. You can also very easily adjust the sensors readout, e.g. TempOffset -1.5 gives an offset of -1.5 degrees.
I have put together sensors for temperature and humidity for use in the garage, the outhouse, on the attic etc. I have tested DHT22, DS1820B, BME280 and BH1750 so far and they all work without issues. The latter two I installed in an outdoor enclosure to use as a simple weather station reporting temperature, humidity, air pressure and light level.
I also got a MH-Z19B CO2 meter for testing to monitor the indoor CO2 levels. The initial feeling is that it does what it should.
In general I have pretty good wifi coverage with a few Unifi access points. One of the sensors is in a building some 25 meters from the house where the wifi is not that strong, but the NodeMCU has no problem with this. Quite impressive and a good addition to Z-wave for that kind of location.
Not owning a 3D printer I have had to resort to purchased enclosures and the old Dremel. 😊
For the CO2 sensor I put it in an old smoke detector enclosure for now.
I am sure that there are a lot of talent here that can do much better with a 3D printer!
CO2meter1.jpgYou can get the data from the Tasmota devices into OpenLuup in a number of ways. The obvious way is via MQTT. I have still to set this up at some point in time. The second way is to use the excellent SiteSensor plugin. I tested this but had some problems with reporting stopping after a few days for some reason. I probably got something wrong in the setup. The third option, that I currently use is via adding rules to each sensor. You can quite easily add rules for reporting data to a virtual sensor in OpenLuup, e.g:
Rule1 ON tele-AM2301#Temperature DO Var1 %value% ENDON ON tele-AM2301#Temperature DO WebSend [IP_adress:3480]/data_request?id=lu_action&DeviceNum=65&id=variableset&serviceId=urn:upnp-org:serviceId:TemperatureSensor1&Variable=CurrentTemperature&Value=%Var1% ENDON
With TelePeriod you can change the polling interval as required.
This method I think could be super useful for reporting back e.g. switch status from a Tasmota node much like I understand Shelly can do.
Some resources and notes I made on the way:
Using Tazmotizer to flash the ESP’s is very easy
List of supported sensors including how to connect, commands etc
A good pinout reference for ESP8266 variants
Tasmota rules documentation
Most sensors are either “Generic (0)” or “Generic (18)”, check for each sensor type what to use
For I2C sensors e.g. BME280 one must use tasmota-sensors.bin
For the MH-Z19B I had to flash the ESP before attaching the sensor, this could be a good practice always
Use the following url for the query in SiteSensor:
http://IP_address/cm?cmnd=Status%2010This became a rather long post but hopefully it can be of some use.
//ArcherS -
Shelly i3 is an unbelievably cheap (9,99 EUR/USD) WiFi device that’s part of the fantastic Shelly family. It supports REST API, MQTT and much more.
mundzhos Shelly i3 | Shelly Cloud Shelly i3 | Shelly Cloud 10It’s just L,N and 3 inputs. No relays, so it’s a scene controller with bonus point to the fact that you can use your own buttons and keep the aesthetics of your house. Bonus points for WAF. It’s very small, so it will fit in your standard wall box easily.
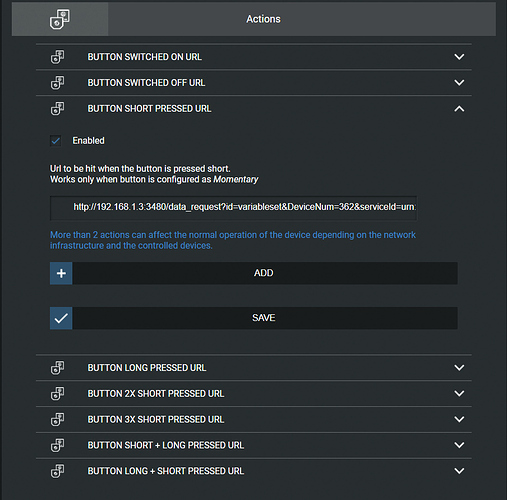
While I built my own Scene Controller Virtual Device and I’m using MQTT for other devices of the family, Shelly can call your HTTP endpoints on button presses and in this case is more than enough.
The buttons support different actions (press, long press, double/triple press) and you can just call a service endpoint, or update a variable:
f3e509c0-f2a7-4f40-a099-af765e87c9fe-image.pngGo get it if you need a very cheap, very reliable scene controller for your home.
-
-
-
Hey guys...
Is it just me or the GE/Jasco switch or very sensible to power outage ?
Almost each time we have a power outage, I need to replace at least 1 switch to replace.
Each time, same behaviour, the blue led is flashing rapidely and nothing works.
Last power outage, I got 3 switches. 95% of our switch and dimmer are GE/Jasco.
-
So, I bought a new Christmas Tree led set from Twinkly (https://www.twinkly.com/).
The security of this thing is questionable, so first thing first I placed it in the blocked IoT Vlan.
The lights will just work (the 3d mapping of your tree is very cool, so effects are really mapped to the way you've set the lights), but, you know, I wanted to control them locally 😄 and I built a plug-in for it. Not sure I'll release it unless someone else is interested.
Twinkly pre lit Christmas Tree 600 count light purchased at Home DepotThey're not cheap and I know I could have accomplished the same with WS2812 leds, but it's worth mentioning if you want a quick and easy way to have effects on your Christmas tree.
Next year I'll definitely start my permanent led installation outside.
-
Since I know there are fans of Shelly's products (hi @akbooer), I'll post it here too:
Shelly Shop Europe Shelly Shop Europe
Up to 45% discount, and 2/4 packs discounted as well.
-
-
-
-
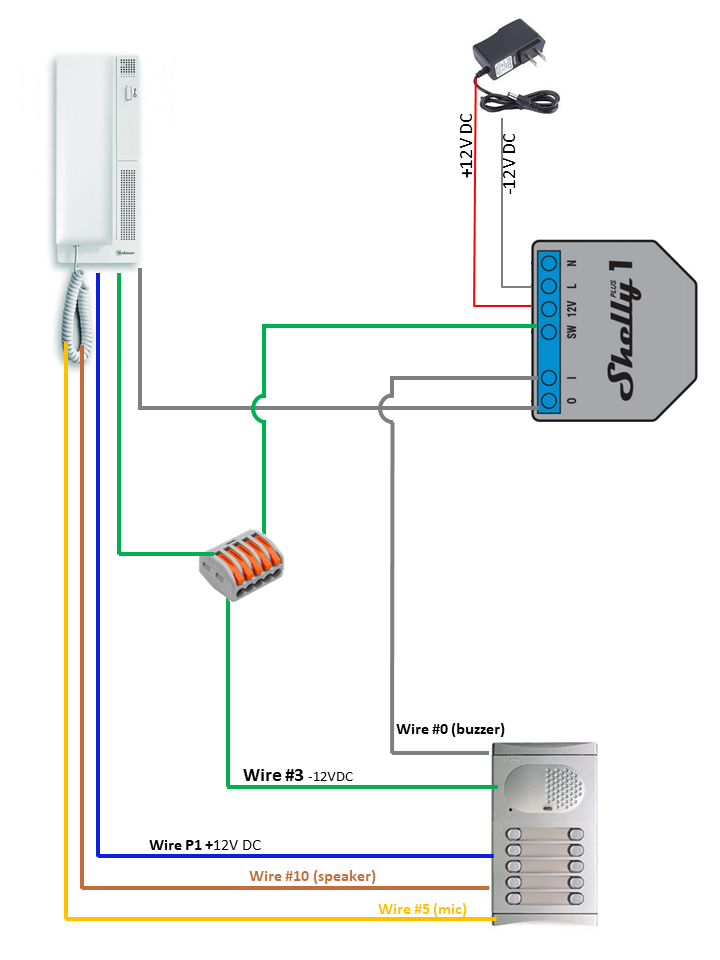
So, I'm at the 4th Z-wave devices and I still have trouble in getting my Vera operate my door gate, and getting the input from the doorbell. It's already all 220v, because I have an external modulo meant for integration.
So, last night I had an idea: why not use a Shelly 1 as both sensor and opener?
If you need instructions on wiring, here's an image:
Shelly 1 can operate the output independently from the input. So, I prototyped this:
I attached to the doorbell sensor O attached to the gate openerIt seems to work on my bench, because I can call the endpoints when the button is pressed or the input is triggered, so I can update virtual devices and execute all the logic I want. I usually integrate these devices with MQTT, but it's not necessary in this case, since I can live with a doorbell buzz being missed.
Bonus point: you can run it at 12v if you want.83c3d861-0169-454d-bd2b-1105042bdfa8-image.png
Next in my TODO list, the Shelly Universal, a 9 EUR universal binary inputs, with separated inputs and outputs (so, you can get 2 inputs and operate 2 outputs independently), that I'll probably use in my weather sensors project, where I'm using two Shelly 1 at the moment, just the get the inputs.
-
I'm going to throw this in here, but I don't actually expect a solution, but it might help someone else.
I have three of these magnetic sensors and the work. Kind of.
The issue is that if you open and close the door within about 2 seconds, they trip correctly and then will not untrip unless the door is opened and closed (for more than about 2 seconds) .
This makes them virtually useless for any security application unless you are very slow through the doors.
Even forcing setting 'Tripped' to zero using lua fails. Well it doesn't fail but it's simply reversed:
2020-07-03 15:01:24.783 luup_log:0: ALTUI: runLua(luup.variable_set("urn:micasaverde-com:serviceId:SecuritySensor1", "Tripped", "0", 20780) 2020-07-03 15:01:24.783 luup.variable_set:: 20780.urn:micasaverde-com:serviceId:SecuritySensor1.Tripped was: 1 now: 0 #hooks:0 2020-07-03 15:01:25.044 luup.variable_set:: 20780.urn:micasaverde-com:serviceId:SecuritySensor1.Tripped was: 0 now: 1 #hooks:0So there it is. Unless anyone has any smart ideas (apart from not opening and closing the doors quickly, I'd avoid buying these.
(PS the only apparent setting that might affect this is the the delay before sending 'untripped' but even setting that to 10 seconds makes no difference. In short, it seems that thee devices have a hardware limitation in how soon they can be tripped.
C
-
I've just completed my setup (after exactly 3 years from moving in, priorities!) and even if I wrote all the code in C#, I could port it easily to LUA (I guess 😄 )
I've used Fully Kiosk Browser + 3D Printed Mount (check https://makesbymike.com/) and a custom HTML dashboard, all running on an Amazon Fire Tablet:
WhatsApp Image 2020-06-29 at 11.05.29.jpeg
60002839-8b8d-4801-bd21-120264b559f8-image.png
WAF is very high 😉
Sorry for the Italian interface. First row is temperature/humidity sensors (esterno = outside, piscina = pool, salotto = open space, zona giorno = 1st floor, zona notte = 2nd floor, lavanderia = laundry room).
Then I have a bunch of commands/scenes sent to Vera to change blinds/roller shutters (they are automatically managed, but wife pretends to be smarter than code, from time to time 🙂 ). Last row has notifications for washer/dryer, with the cycle end date. When doing its cycle, the background becomes orange, then green when completed. It's probably the best feature, since the laundry room is in the basement. There's also a link to cams (videosorveglianza) and I automatically open TinyCamPro in case of movement outside/doors/gates are opened.Is there any interest in a generic wall mount tablet plug-in, offering simple dashboard (maybe json-driven) and integration with Fully Kiosk API?
I'm currently dimming screen on/off, get the battery status and schedule a 20-80 cycle for the battery, via a smart plug and a bunch of lua code. I planned for this when I did the electrical setup, so the tablet has a standard european 503 (recessed) box with ethernet, that I attached to the 5V into the network closet to feed the tablet. I'm updating the screen via AJAX every 30 secs.
Here's a behind the scenes photo as well 🙂
-
-
I'm in the middle of adding a water tank, because the latest summers were very hot and we had our water restricted, sometimes for weeks and for extended hours during the day (from 7 am to 5 pm).
It should be automatic, thanks to pressure sensors, so it will integrate water when needed (and the main line is open), switch the pump, etc. But I want to add a water level sensor nonetheless, to monitor it if necessary. I will probably just double this project and automate the pool refill as well, since I'm doing it manually at the moment.
I took a look and a lot of people are using Zunos, but I'm not sure I want to spend so much on a so simple system.
Pre-built solutions are OK. Thanks! -
I'm in the process of trying to get some info from my pool controller using Modbus. If I'll ever succeed, I want to write a generic plug-in for Vera/openluup, to be added to my collection of virtual device plug-in. I'll write a custom app in a Raspberry offering access to the controller via HTTP.
Long story short, I think I'm almost covered. Typical device:
heater pumps (on/off) jets (on/off) lights (dimmers, on/off) filtration (on/off) temperature sensor generic sensor (for ph/redox probes)I think I'm almost covered by standard devices, but I'm wondering if there's something I'm missing.
I'll probably use a multistring to display status, since it's already supported in mobile apps, but I'm wondering if there's some kind of more granular way to show something and avoid custom devices and similar. -
-
I had this setup and working perfectly in my vera for years. I recently accidentally deleted the device. I tried to re-add it as generic zwave. No problem, all devices come up fine and work. But the vera keeps trying to get secure classes. This is an old device I don’t think it’s zwave plus and it worked on my vera vefore. Vera can’t configure the parameters on the device and vera thinks its a failed device. But it works. Any experts know this one?
|-<:) -
Understanding the flash memory endurance problem
-
I am seeing a lot reports and complains throughout various home automation forums about people complaining about failed flash:
SD cards (notoriously rPis and all SBCs for every known platforms)
USB drives (vera USB logging)
and internal on board flash for vera.All of these cause system failures and data corruption. While the vera is a case of needless auto-flagellation with their very highly rated SLC NAND flash paired with a mind boggling drive partitioning causing them to barely use 10% of the storage space the hardware makes available, the others are due to using inappropriate hardware for their purpose.
What is important to know is that a flash memory cell has a limited lifetime.
The smaller the cell is, the thinner the gate holding the charge is and the more fragile/less enduring it is. This is why the industry has gone vertical with V-NAND or 3D NAND instead of just shrinking the size of the cells to reduce cost and increase density.Following this move to the third dimension, came the idea that each charge could contain more than one bit by holding different state values. That's what MLC (Multi Level Cell, in practice only 2) and TLC (Tri Level Cell) and now QLC (Quad Level Cell). MLC means that the cell now has 4 states (2^2), TLC has 8 (2^3), QLC has 16 (2^4) states or distinct cell voltage levels. The compromise to these multi-level of the cells is increased error rate and lower reliability (accuracy of the charge depends in part on how worn the gate is) which needs to be compensated by ECC in their controllers. It is indeed harder to get the voltage right than a digital have voltage or have not logic. The difference in endurance can be a couple of orders of magnitude! The cheaper NAND flash like what you find in eMMC, SD cards and most USB flash drives are slow and have less write endurance because of they use the cheaper QLC/TLC technologies. (1GB QLC costs the same to make as 256MB of SLC and possibly significantly less because of smaller cell size)
Another layer of reliability improvements in SSDs has been TRIM, garbage collection, and wear leveling. All three features are meant to distribute the writing more evenly across the cells, run background reset of the cells so as to speed up the write process...
Well none of these exist on a controller-less NAND like an SD card or eMMC and this is why you could have a large flash drive corrupt data because it's been overwriting the exact same cells over and over while the rest of the cells may never have been used.For a home automation platform which needs to constantly save variable states and logs in various files, an SSD is definitely a better way to go than those controller-less storages... This is even more true for embedded/non replaceable storage...