Need help backing up Raspberry Pi
-
Hello
I have a 64GB SD card in my Raspberry Pi.
I read some guides online and the ones that looked easy to follow use a program call Win32 Disk Imager to make an image of the entire SD card.
I shutdown the Pi and when I insert the SD card in to my Windows 10 PC, I can see drive letter D:\ appear and its label is "boot"
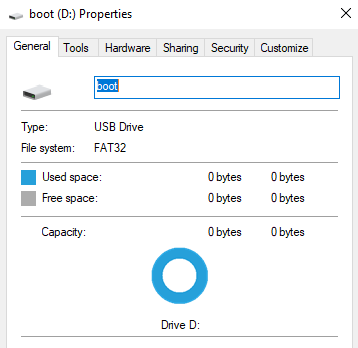
Looking at this disk in Windows Disk management it looks a bit strange however as it has a massive unallocated area.

Anyway I proceeded to backup the disk D:\ using Win32 Disk Imager program.
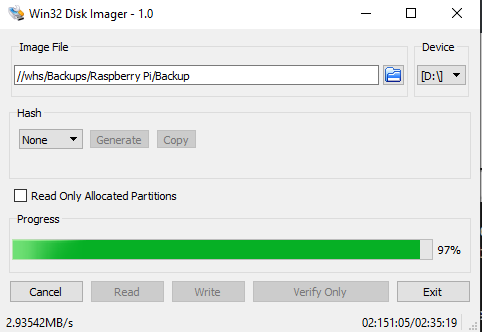
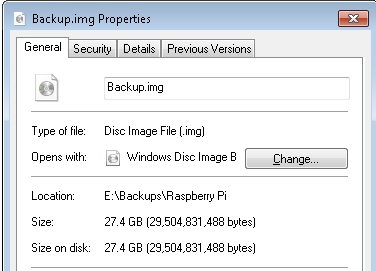
It took a long time but it has created an .img file which is 27.4GB in file size.
I then put the SD card back in to the Pi and powered it on.
Here is a "df" output from the Pi
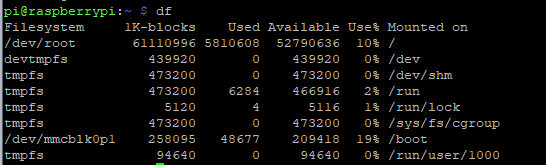
Looks like I am not using the full 64GB of the SD card.
When I first setup the Pi I was using a much smaller SD card and then I bought a decent Sandisk 64GB card and followed some other user guide found online to clone my original smaller card to the new card and expand etc.
So have I actually just backed up the Pi's SD card and all its contents successfully ?
-
Yes, almost certainly. But when you cloned your smaller drive, you didn't expand the partition.
You should be able to extend that partition to use more space, or, format it and mount it somewhere else.
Make sense?
C
The Ex-Vera abuser know as CatmanV2.....
-
Yes, almost certainly. But when you cloned your smaller drive, you didn't expand the partition.
You should be able to extend that partition to use more space, or, format it and mount it somewhere else.
Make sense?
C
Hi thanks for the reply.
I think my original SD card when I first got the Pi was like 8GB max.
I'm not sure which online guide I followed now to clone the SD card and move to the new SanDisk 64GB card as it was some time ago now.
If I expand the partition now then my Win32 Disk Imager backup with be even bigger at 64GB etc.
I have seen some other user guides for backing up a Pi that didn't image the entire SD card and the resulting backup file(s) were much smaller. But those guides look more difficult / involved to follow, with many more steps etc.
So now I am unsure how much space my Pi can currently use?
-
@cw-kid a decent imager won't make your backup bigger, i.e. it won't back up the empty space. That being said, do you have some kind of limitation on your backup size? 64G is not exactly big on the current scale of things.
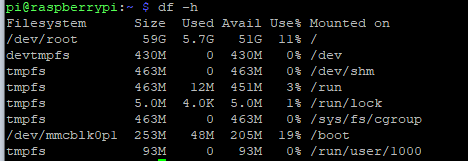
If run df -h it will give you human readable sizes
") My reading of that is that it's currently 64G give or take, which is what you'd expect, but I'm not working at my best due to side effects
My reading of that is that it's currently 64G give or take, which is what you'd expect, but I'm not working at my best due to side effects ")
Do df -h and see what the numbers come up as.
C
The Ex-Vera abuser know as CatmanV2.....
-
@cw-kid a decent imager won't make your backup bigger, i.e. it won't back up the empty space. That being said, do you have some kind of limitation on your backup size? 64G is not exactly big on the current scale of things.
If run df -h it will give you human readable sizes
My reading of that is that it's currently 64G give or take, which is what you'd expect, but I'm not working at my best due to side effects Do df -h and see what the numbers come up as.
C
59GB with 5.7G used ?
So why did this Win32 Disk Imager program create a 27.4GB .img file ?
If there is better imager program I should be using? I can swap to using that.
The portable disk I stored the .img backup file on, is large enough to cope with a single .img file of 64GB in size if need be.
Thanks
-
Don't forget that you're not looking at discs here. You're looking at partitions and mount points.
What I am seeing is you've got a full 64G SD allocated and mounted to various points in your file system. Most of it is in /root and most of it is unused.As to why you ended up with a 27G backup, I have no idea other than Windows is probably not terribly happy reading Linux file systems and partition info. It was never terribly well supported.
I don't really know many Windows tools these days, being a dyed in the wool BSD / Linux guy.
If you only have Windows, I used to use Acronis (many years back). The other thing you could do is use a live Linux CD and use one of the tools there. Even the terribly basic dd would be able to do it.
I would expect though that a properly functioning tool would create a 7Gish backup file. So yes, something is amiss. Can't tell if that means your backup is non-functional or not, though.
Have you got another SD card? Restore to that, shut the pi down and try and boot from the newly restored card if you need to test.
C
C
-
Just to toss another alternative in here, I use Clonezilla for imaging just about everything. It's not very user-friendly; you need to know a bit, like be able to correctly and surely identify which disk (/dev/sda b c d e...) is the source and which is the target, but it's a wrapper for standard tools (partclone, mostly) that do a good job of making filesystem images that back up only the used space. It also automatically grows and shrinks filesystems to new target partitions (if they fit) on restores, etc. You just make a boot CD/DVD or USB stick and off you go. It supports pretty much all filesystem types (msdos, ext2/3/4, ntfs, and of course, raw/unknown), so there's little you can't back up with it. I keep a 1TB M.2 drive in a USB 3.1 enclosure to use as a target for the images and then copy them to my NAS for long-term storage.
-
Exactly the kind of tool I'd use (although CCC on the Mac basically means you don't have to) but figured the lack of user friendliness would be a down point here
C
-
In Win32DiskImager there is a option for "read only allocated partitions". It is shown in the instruction linked from this thread.
The same instruction also describes how to use Gparted in Linux to resize the .img if so required. -
Don't forget that you're not looking at discs here. You're looking at partitions and mount points.
What I am seeing is you've got a full 64G SD allocated and mounted to various points in your file system. Most of it is in /root and most of it is unused.As to why you ended up with a 27G backup, I have no idea other than Windows is probably not terribly happy reading Linux file systems and partition info. It was never terribly well supported.
I don't really know many Windows tools these days, being a dyed in the wool BSD / Linux guy.
If you only have Windows, I used to use Acronis (many years back). The other thing you could do is use a live Linux CD and use one of the tools there. Even the terribly basic dd would be able to do it.
I would expect though that a properly functioning tool would create a 7Gish backup file. So yes, something is amiss. Can't tell if that means your backup is non-functional or not, though.
Have you got another SD card? Restore to that, shut the pi down and try and boot from the newly restored card if you need to test.
C
C
-
@catmanv2 said in Need help backing up Raspberry Pi:
Have you got another SD card? Restore to that
No I haven't. Not the same size anyway.
I think I will buy another SanDisk 64GB SD card and make sure I can actually restore to a new card etc.
@cw-kid said in Need help backing up Raspberry Pi:
@catmanv2 said in Need help backing up Raspberry Pi:
Have you got another SD card? Restore to that
No I haven't. Not the same size anyway.
I think I will buy another SanDisk 64GB SD card and make sure I can actually restore to a new card etc.
That's a sensible approach anyway.
As for the 'Read only allocated partitions' it seems that Windows struggles to see the Pi partition (other than /boot) as allocated....C
-
If you'd run
ddon an Ubuntu laptop for images, you might consider installing and runningpartcloneinstead. It's the workhouse underlying Clonezilla, and it will produce smaller backup images (it only copies used space; dd copies, all blocks used or not).To make an image of a disk (
/dev/sda2in this example):partclone -c -o /path/to/image-output -s /dev/sda2And to restore that image later (same target device):
partclone -r -s /path/to/image-input -O /dev/sda2Since the images can get very large (and may even grow larger than the filesystem allows), you can compress and split the image like this:
partclone -c -s /dev/sda2 -o - | gzip -c | | split -a 2 -b 2G - /path/to/imagefile.gz.This will compress the output and split it into 2GB files, each having a '.gz.xx' ending, where xx is a two-letter code that keeps the parts sorted. To restore it:
cat /path/to/imagefile.gz.* | gunzip -c | partclone -r -s - -O /dev/sda2 -
@black-cat said in Need help backing up Raspberry Pi:
A simple to use "cloner" is Balena Etcher - it's gotten me out of trouble many times.
Mac only, though, isn't it?
C
")