
openLuup: Tasmota MQTT Bridge
-
@therealdb said in openLuup: Tasmota MQTT Bridge:
I'm eager to help to map them to child devices.
Oh, I didn't think that was necessary since you made it so easy to create virtual devices? You want ALL the child devices to be separate? This could become messy.
@akbooer if we want to make it user friendly, I think it’s the easiest thing to do. I could of course do it with my virtual plugin in a future update if you think it’d be better to leave it to each setup.
EDIT: or just don’t implement it, since I forgot about virtual sensor. Ok, I think we’re covered now.
-
Thought it could be good for future users to give a short write up on how to set up Tasmota devices reporting sensors into OpenLuup with the new Tasmota bridge.
First setup the Tasmota device:
Browse to the Tasmota device IP and then select "Configuration"
 Go into Configuration Other
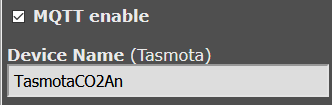
Make sure "Mqtt enable" is set and give a Device Name
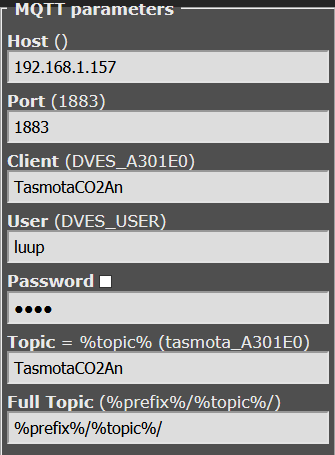
 Then into Configuration MQTT
Give IP adress and port of OpenLuup Mqtt server
Give a Client name
Set user and password
Set topic name
If you want to change how often the Tasmota device pushes data over Mqtt you can do that in the Console for the Tasmota by using the "TelePeriod" command. By default TelePeriod is set to 300 seconds, e.g. "TelePeriod 60" sets it to once every minute. (Just typing "TelePeriod" shows the current value.)
Second set up OpenLuup:
Paste the following into Lua Startup:luup.attr_set ("openLuup.MQTT.Port", 1883) luup.attr_set ("openLuup.MQTT.Username", "luup") luup.attr_set ("openLuup.MQTT.Password", "password") luup.attr_set ("openLuup.MQTT.PublishVariableUpdates", true) -- Not requred for Tasmota, publish every variable update if wantedSave and reload Luup engine, you should now get the Tasmota bridge in OpenLuup

You should also get the Tasmota device you setup above
 On my OpenLuup it got placed in the room "Tasmota".
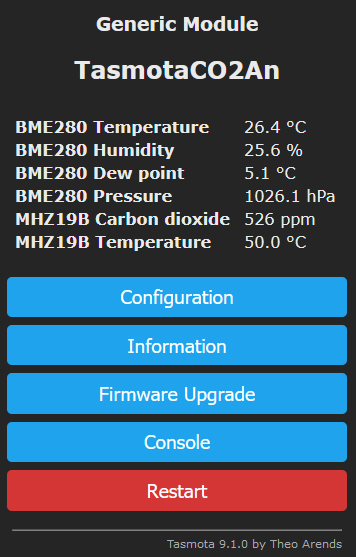
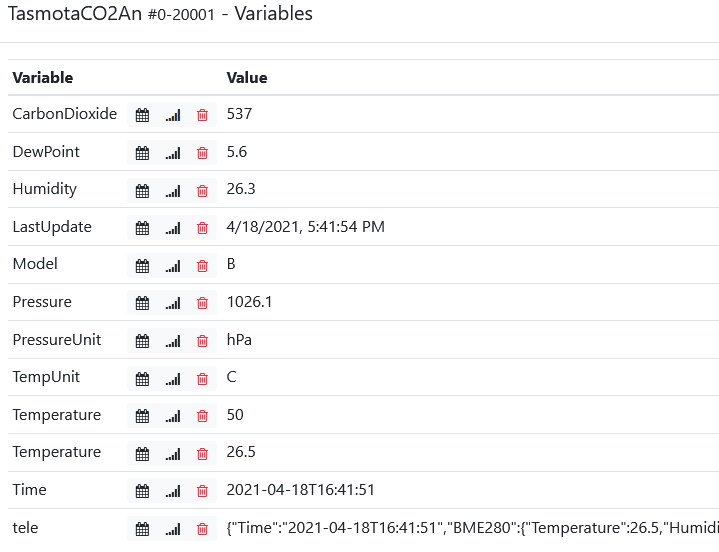
Next step is to set up devices for the sensor data you want to get from the Tasmota device. This data is pushed into variables for the Tasmota device (if you hover above a variable name you see the sensor, e.g. "BME280"):
Download the plugin "Virtual Sensor" if you do not have it.
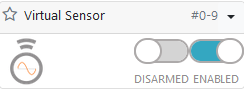 Go into Virtual Sensors, tab "Virtual Sensors" and create the new virtual sensors you need for the data you want to display from the Tasmota device, you want one virtual sensor per value.
Next step is to set the data from the Tasmota variables to the corresponding virtual sensors.
Go into the Virtual Sensor plugin, into the tab "Virtual Sensors"
Select the Tasmota device in the first drop down and then the variable in the second: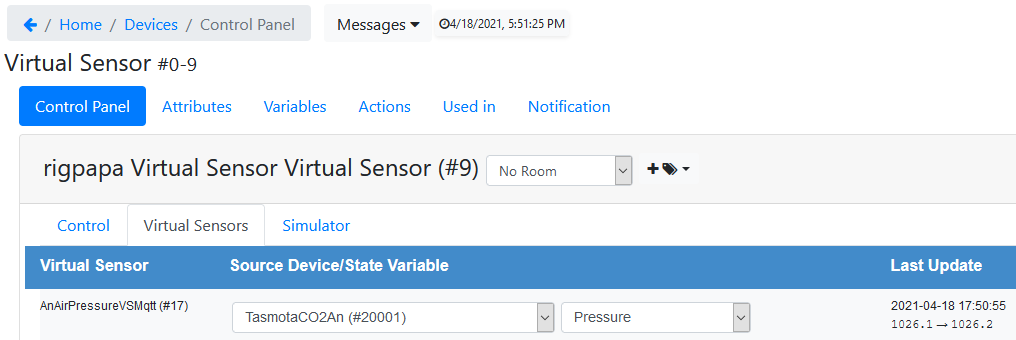
Job done! Now repeat for all the variables you wish to add into OpenLuup.
")
-
That’s great, thanks on behalf of all future users!
AFAIK, you don’t need to enable the PublishVariableUpdates MQTT option in order for the Tasmota bridge to work (since it is, itself, only one-way) although you may need it for other purposes.
-
That’s great, thanks on behalf of all future users!
AFAIK, you don’t need to enable the PublishVariableUpdates MQTT option in order for the Tasmota bridge to work (since it is, itself, only one-way) although you may need it for other purposes.
@akbooer said in openLuup: Tasmota MQTT Bridge:
AFAIK, you don’t need to enable the PublishVariableUpdates MQTT option in order for the Tasmota bridge to work (since it is, itself, only one-way) although you may need it for other purposes.
You are of course correct!
I edited the remark for that line in the example above.
By the way, I have tested this enabled and not enabled on my test Pi and it does not affect the cpu load as far as I could see. It stayed at 4-4.5% in both cases. -
That’s great, thanks on behalf of all future users!
AFAIK, you don’t need to enable the PublishVariableUpdates MQTT option in order for the Tasmota bridge to work (since it is, itself, only one-way) although you may need it for other purposes.
@akbooer speaking of this, are you ok if I release a simple plugin to push data from Veras to openluup UDP? I have one in my system and it’s working flawlessly. I could port it easily. I just need a flag to disable polling from VeraBridge. It’s ok to call Vera’s endpoint to update status.
-
Yes, fine with that! So you just need the existing bridge to create the devices, and control them, but use UDP to update them?
I’m doing this with scene controllers myself, at the moment.
@akbooer No errors in 2021.04.18. Thanks for this as the changes also stabilized my Mosquitto bridge connection, which tended to flop with every error message.
2021-04-18 15:29:04.173 luup.tasmota:262: Topic ignored : tele/power_ServerWork/LWT : Online 2021-04-18 15:29:04.175 luup.tasmota:262: Topic ignored : tele/power_MainVera/LWT : Online 2021-04-18 15:29:04.176 luup.tasmota:262: Topic ignored : tele/power_HAServer/LWT : Online 2021-04-18 15:29:04.177 luup.tasmota:262: Topic ignored : tele/power_SideLandscape/LWT : Online 2021-04-18 15:29:04.178 luup.tasmota:262: Topic ignored : tele/power_GarageVera/LWT : Online -
Yes, fine with that! So you just need the existing bridge to create the devices, and control them, but use UDP to update them?
I’m doing this with scene controllers myself, at the moment.
-
@akbooer No errors in 2021.04.18. Thanks for this as the changes also stabilized my Mosquitto bridge connection, which tended to flop with every error message.
2021-04-18 15:29:04.173 luup.tasmota:262: Topic ignored : tele/power_ServerWork/LWT : Online 2021-04-18 15:29:04.175 luup.tasmota:262: Topic ignored : tele/power_MainVera/LWT : Online 2021-04-18 15:29:04.176 luup.tasmota:262: Topic ignored : tele/power_HAServer/LWT : Online 2021-04-18 15:29:04.177 luup.tasmota:262: Topic ignored : tele/power_SideLandscape/LWT : Online 2021-04-18 15:29:04.178 luup.tasmota:262: Topic ignored : tele/power_GarageVera/LWT : Online -
@akbooer I am now testing my Tasmota IR Tranceiver with the Tasmota Mqtt Bridge on my test Pi running OpenLuup v21.4.29b.
Link to Tasmota IR documentation.When looking in the Console the Tasmota sends the following messages when I start it:
00:00:03 MQT: Attempting connection...
00:00:03 MQT: Connected
00:00:03 MQT: tele/TasmotaIR/LWT = Online (retained)
00:00:03 MQT: cmnd/TasmotaIR/POWER =
00:00:03 MQT: tele/TasmotaIR/INFO1 = {"Module":"Generic","Version":"9.1.0(ir)","FallbackTopic":"cmnd/TasmotaIR_fb/","GroupTopic":"cmnd/tasmotas/"}
00:00:03 MQT: tele/TasmotaIR/INFO2 = {"WebServerMode":"Admin","Hostname":"TasmotaIR-2895","IPAddress":"192.168.1.59"}
00:00:03 MQT: tele/TasmotaIR/INFO3 = {"RestartReason":"Software/System restart"}
00:00:06 QPC: Reset
00:00:07 MQT: tele/TasmotaIR/STATE = {"Time":"1970-01-01T00:00:07","Uptime":"0T00:00:09","UptimeSec":9,"Vcc":3.069,"Heap":25,"SleepMode":"Dynamic","Sleep":50,"LoadAvg":29,"MqttCount":1,"Wifi":{"AP":1,"SSId":"BeachAC","BSSId":"FC:EC:DA:D1:7A:64","Channel":11,"RSSI":66,"Signal":-67,"LinkCount":1,"Downtime":"0T00:00:03"}}
It does however not show up as a Tasmota child device in OpenLuup for some reason.
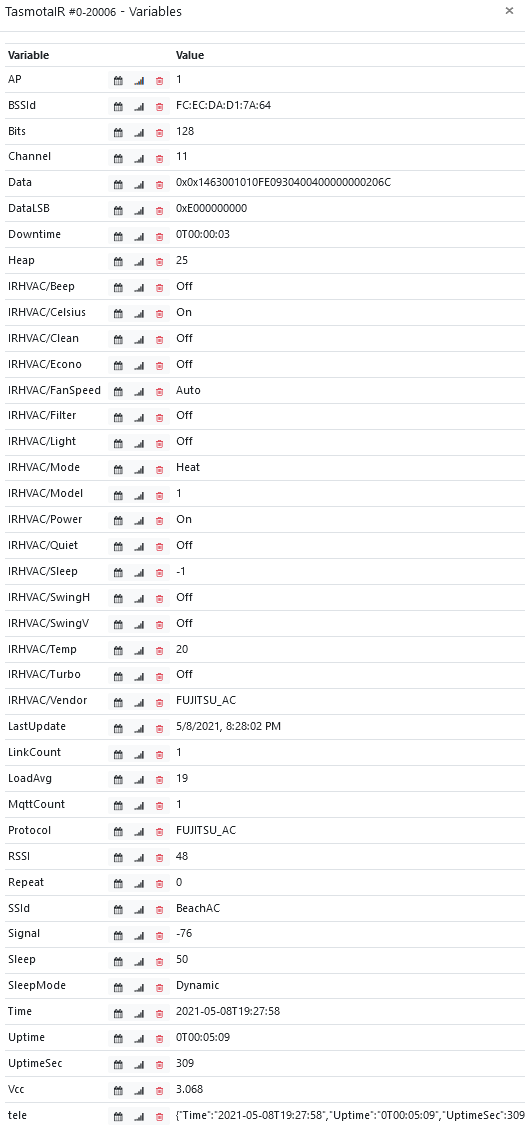
The idea is to use it for my HVAC, the following message is received when I press a button on the remote:
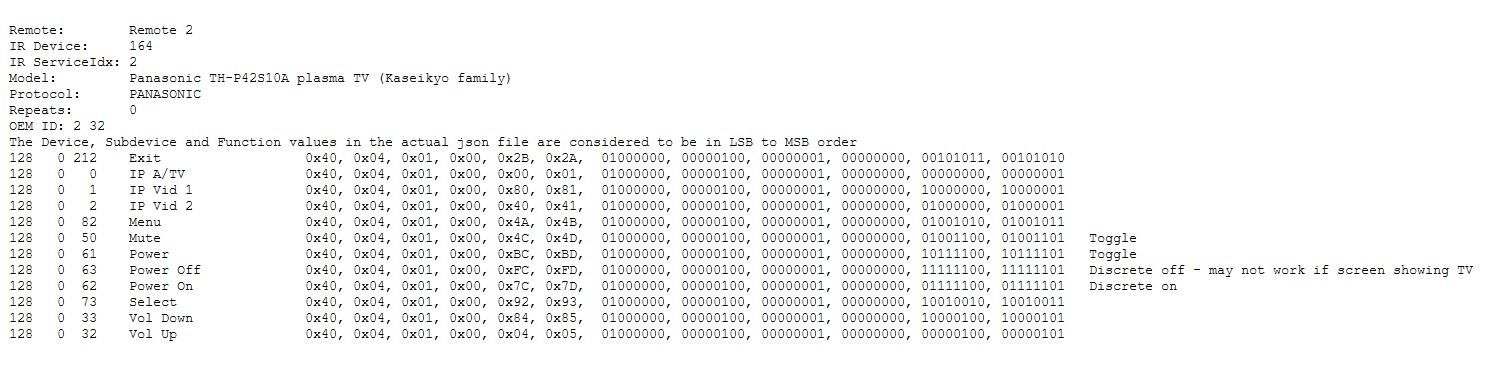
17:53:29 MQT: tele/TasmotaIR/RESULT = {"IrReceived":{"Protocol":"FUJITSU_AC","Bits":128,"Data":"0x0x1463001010FE0930400400000000206C","Repeat":0,"IRHVAC":{"Vendor":"FUJITSU_AC","Model":1,"Mode":"Heat","Power":"On","Celsius":"On","Temp":20,"FanSpeed":"Auto","SwingV":"Off","SwingH":"Off","Quiet":"Off","Turbo":"Off","Econo":"Off","Light":"Off","Filter":"Off","Clean":"Off","Beep":"Off","Sleep":-1}}}The other application for a Tasmota IR Tranceiver would be for regular remotes for TVs etc. A message from a regular IR remote (for a cheap Led light) looks like this:
17:56:21 MQT: tele/TasmotaIR/RESULT = {"IrReceived":{"Protocol":"NEC","Bits":0,"Data":"0xFFFFFFFFFFFFFFFF","DataLSB":"0xFFFFFFFFFFFFFFFF","Repeat":1}} -
@akbooer thanks that worked right away.
The child device is added and the variables are populated as they should.
I tried both the HVAC remote and the led light one and the both seem to report as they should.
Briliant support as always!
Next question is how to send Mqtt commands from inside OpenLuup to one of the Tasmota devices?
It is probably quite simple, but I have missed how to do that.As far as I have found out the Mqtt command for controlling an HVAC is something like:
cmnd/<device_name>/IRhvac {"Vendor":"LG2", "Power":"On","Mode":"Hot","FanSpeed":3,"Temp":22.5}So far I have only received messages from the Mqtt/Tasmota devices, so not quite sure how to do that.
-
Next question is how to send Mqtt commands from inside OpenLuup to one of the Tasmota devices?
It is probably quite simple, but I have missed how to do that.As far as I have found out the Mqtt command for controlling an HVAC is something like:
cmnd/<device_name>/IRhvac {"Vendor":"LG2", "Power":"On","Mode":"Hot","FanSpeed":3,"Temp":22.5}So far I have only received messages from the Mqtt/Tasmota devices, so not quite sure how to do that.
Because there’s infinite variety, I’ve not implemented any command/control from the Tasmota bridge.
I could certainly add a device action to send a generic command with device_name and command parameters, or such like, if that helps.
Edit: the alternative is to publish an MQTT message directly.
-
Because there’s infinite variety, I’ve not implemented any command/control from the Tasmota bridge.
I could certainly add a device action to send a generic command with device_name and command parameters, or such like, if that helps.
Edit: the alternative is to publish an MQTT message directly.
@akbooer I think that I could try publishing an Mqtt message directly first. A generic command could perhaps also be of use.
The below text is edited after I got it to work by adding \ before the " so that it is passed trough as it should.
I found this:
local mqtt = luup.openLuup.mqtt
mqtt.publish ("My/Topic/Name", "My Application message")For my simple test this works from Lua Code Test:
cmnd/<device_name>/IrSend/ <rest of the message>
e.g.
luup.openLuup.mqtt.publish ("cmnd/TasmotaIR/IrSend","{\"Protocol\":\"NEC\",\"Bits\":32,\"Data\":\"0x10EF08F7\",\"DataLSB\":\"0x08F710EF\",\"Repeat\":0}")I will continue to try this for the HVAC, something like this:
cmnd/<device_name>/IRhvac <rest of message>
e.g.
cmnd/TasmotaIR/IrSend/ {\"Vendor\":\"LG2\", \"Power\":\"On\",\"Mode\":\"Hot\",\"FanSpeed\":3,\"Temp\":22.5} -
@akbooer I think that I could try publishing an Mqtt message directly first. A generic command could perhaps also be of use.
The below text is edited after I got it to work by adding \ before the " so that it is passed trough as it should.
I found this:
local mqtt = luup.openLuup.mqtt
mqtt.publish ("My/Topic/Name", "My Application message")For my simple test this works from Lua Code Test:
cmnd/<device_name>/IrSend/ <rest of the message>
e.g.
luup.openLuup.mqtt.publish ("cmnd/TasmotaIR/IrSend","{\"Protocol\":\"NEC\",\"Bits\":32,\"Data\":\"0x10EF08F7\",\"DataLSB\":\"0x08F710EF\",\"Repeat\":0}")I will continue to try this for the HVAC, something like this:
cmnd/<device_name>/IRhvac <rest of message>
e.g.
cmnd/TasmotaIR/IrSend/ {\"Vendor\":\"LG2\", \"Power\":\"On\",\"Mode\":\"Hot\",\"FanSpeed\":3,\"Temp\":22.5}Yes, that will work, although two alternatives are available to make the string handling easier...
'{"Vendor":"LG2", "Power":"On", "Mode":"Hot", "FanSpeed":3, "Temp":22.5}'or
[[{"Vendor":"LG2", "Power":"On", "Mode":"Hot", "FanSpeed":3, "Temp":22.5}]] -
Yes, that will work, although two alternatives are available to make the string handling easier...
'{"Vendor":"LG2", "Power":"On", "Mode":"Hot", "FanSpeed":3, "Temp":22.5}'or
[[{"Vendor":"LG2", "Power":"On", "Mode":"Hot", "FanSpeed":3, "Temp":22.5}]] -
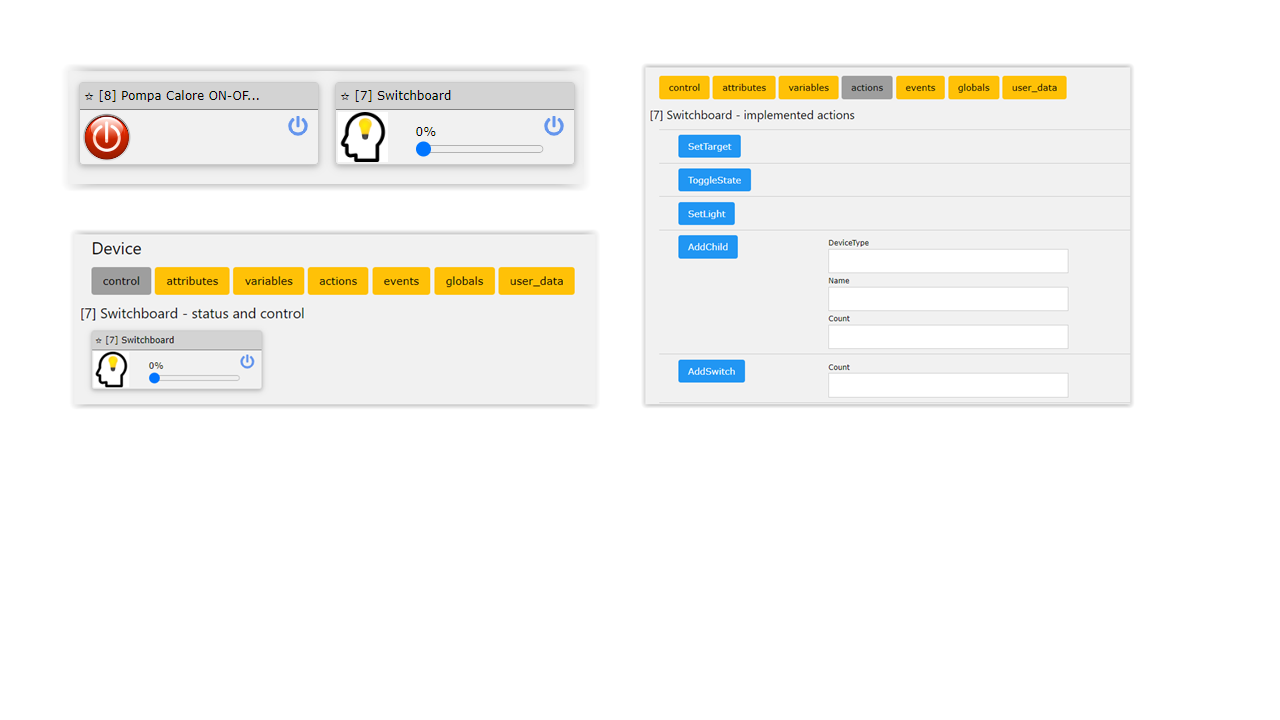
@archers if you want virtual device, v3 beta of my Virtual Devices can send MQTT messages under openLuup, for attached and supported devices/actions.
@therealdb that sounds interesting! I will try that.
Edit: I do not remember; how do I update to the v3 beta for the Virtual Devices plugin? Also I am a bit unsure how I can see the current version.
I typed in "development" in the plugins table and it says "GitHub.development", should that do it?