
openLuup: Tasmota MQTT Bridge
-
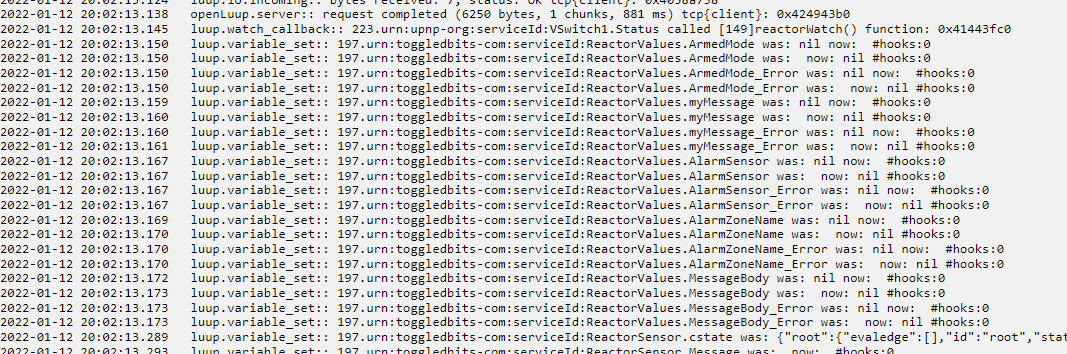
Version 21.4.17d adds an additional error message to see what is causing the JSON error. However, this should be totally recoverable, the message is simply ignored.
@akbooer My log is much calmer with the oL update. Thanks for that. I still have the following error though:
2021-04-17 13:41:37.079   luup.tasmota:262: JSON error: ?
2021-04-17 13:41:37.080   luup.tasmota:262: Received message causing error was: Online
This happens only on a LUUP reload. If I were to guess, the JSON decoder is seeing a single text string, so it doesn't/can't really decode, but throws an error instead. Maybe trap for strings before being sent to the decoder.... They are valid messages and should not throw receive errors or decode errors.
-
Version 21.4.17d adds an additional error message to see what is causing the JSON error. However, this should be totally recoverable, the message is simply ignored.
-
Version 21.4.17d adds an additional error message to see what is causing the JSON error. However, this should be totally recoverable, the message is simply ignored.
@akbooer And the below error is probably related to the string error:
2021-04-17 13:48:51.407 openLuup.context_switch:: ERROR: [dev #0] attempt to call a string value 2021-04-17 13:48:51.407 openLuup.mqtt:: ERROR publishing application message for mqtt:tele/power_BedroomTV/SENSOR : attempt to call a string value -
Version 21.4.17d adds an additional error message to see what is causing the JSON error. However, this should be totally recoverable, the message is simply ignored.
@akbooer The table level decode issue is a byproduct of the type of relay I'm using in the above examples.
This tasmota relay controls two separate outputs (switches), as well as an unlimited number of bluetooth sensors that see/connect to the relay. So for example, I placed the above mentioned relay behind a standard wall power outlet that has its two plug ports separated into two different circuits. One outlet of the relay controls the top plug and the other relay outlet controls the bottom.
This is not uncommon with the tasmota devices as I also have a four relay tasmota device that controls four different circuits of my landscape lights, though there is only a single device with a single IP address.
-
@akbooer The table level decode issue is a byproduct of the type of relay I'm using in the above examples.
This tasmota relay controls two separate outputs (switches), as well as an unlimited number of bluetooth sensors that see/connect to the relay. So for example, I placed the above mentioned relay behind a standard wall power outlet that has its two plug ports separated into two different circuits. One outlet of the relay controls the top plug and the other relay outlet controls the bottom.
This is not uncommon with the tasmota devices as I also have a four relay tasmota device that controls four different circuits of my landscape lights, though there is only a single device with a single IP address.
My devices seem to have been discovered OK, albeit as generic. I'm eager to help to map them to child devices. Even with different sensors, the variable name seems to be consistent.
Here's what I have:
- Temperature
- Humidity
- Distance
- DewPoint
- IR
- Illuminance
- Pressure
- Broadband (for light)
I think that if multiple are present, multiple child devices could be created. I could also help with code @akbooer if you need help.
--
On a mission to automate everything. -
My devices seem to have been discovered OK, albeit as generic. I'm eager to help to map them to child devices. Even with different sensors, the variable name seems to be consistent.
Here's what I have:
- Temperature
- Humidity
- Distance
- DewPoint
- IR
- Illuminance
- Pressure
- Broadband (for light)
I think that if multiple are present, multiple child devices could be created. I could also help with code @akbooer if you need help.
@therealdb said in openLuup: Tasmota MQTT Bridge:
I'm eager to help to map them to child devices.
Oh, I didn't think that was necessary since you made it so easy to create virtual devices? You want ALL the child devices to be separate? This could become messy.
-
@therealdb said in openLuup: Tasmota MQTT Bridge:
I'm eager to help to map them to child devices.
Oh, I didn't think that was necessary since you made it so easy to create virtual devices? You want ALL the child devices to be separate? This could become messy.
@akbooer I think it is quite good without the plugin creating a lot of child devices for Tasmota sensor devices.
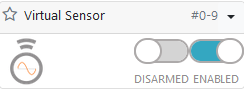
Instead I create child devices myself with the excellent Virtual Sensor plugin for the ones I want (I typically do not want child devices for all the data from a Tasmota sensor). I then simply map each virtual sensor to the device and variable in the Virtual Sensor plugin:

Super easy and clean without any coding.
")
For Tasmota switches or similar where you typically want to send Mqtt data to the device it may be a bit different of course. I have not tested any of these yet. Perhaps the Mqtt addition to the Virtual Http plugin from @therealdb is the right path here? I have still to test this.
I have a Tasmota IR tranceiver that I will test for controlling my HVAC, but I have not come that far yet! -
@akbooer I think it is quite good without the plugin creating a lot of child devices for Tasmota sensor devices.
Instead I create child devices myself with the excellent Virtual Sensor plugin for the ones I want (I typically do not want child devices for all the data from a Tasmota sensor). I then simply map each virtual sensor to the device and variable in the Virtual Sensor plugin:
Super easy and clean without any coding.
For Tasmota switches or similar where you typically want to send Mqtt data to the device it may be a bit different of course. I have not tested any of these yet. Perhaps the Mqtt addition to the Virtual Http plugin from @therealdb is the right path here? I have still to test this.
I have a Tasmota IR tranceiver that I will test for controlling my HVAC, but I have not come that far yet!@archers said in openLuup: Tasmota MQTT Bridge:
I typically do not want child devices for all the data from a Tasmota sensor
Yes, that would be my thinking too.
I went through the same issues when creating the Netatmo plugin, and the auto-creation of child devices made it overly complex, handling all the possible options. If I started again (and I may now make a simplified Netatmo 'bridge') I'd just leave that to manually created virtual sensors.
-
@therealdb said in openLuup: Tasmota MQTT Bridge:
I'm eager to help to map them to child devices.
Oh, I didn't think that was necessary since you made it so easy to create virtual devices? You want ALL the child devices to be separate? This could become messy.
@akbooer if we want to make it user friendly, I think it’s the easiest thing to do. I could of course do it with my virtual plugin in a future update if you think it’d be better to leave it to each setup.
EDIT: or just don’t implement it, since I forgot about virtual sensor. Ok, I think we’re covered now.
-
Thought it could be good for future users to give a short write up on how to set up Tasmota devices reporting sensors into OpenLuup with the new Tasmota bridge.
First setup the Tasmota device:
Browse to the Tasmota device IP and then select "Configuration"
 Go into Configuration Other
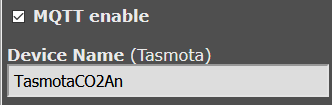
Make sure "Mqtt enable" is set and give a Device Name
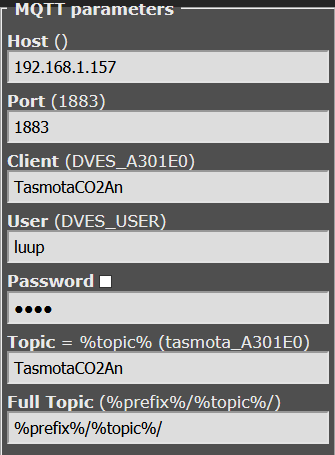
 Then into Configuration MQTT
Give IP adress and port of OpenLuup Mqtt server
Give a Client name
Set user and password
Set topic name
If you want to change how often the Tasmota device pushes data over Mqtt you can do that in the Console for the Tasmota by using the "TelePeriod" command. By default TelePeriod is set to 300 seconds, e.g. "TelePeriod 60" sets it to once every minute. (Just typing "TelePeriod" shows the current value.)
Second set up OpenLuup:
Paste the following into Lua Startup:luup.attr_set ("openLuup.MQTT.Port", 1883) luup.attr_set ("openLuup.MQTT.Username", "luup") luup.attr_set ("openLuup.MQTT.Password", "password") luup.attr_set ("openLuup.MQTT.PublishVariableUpdates", true) -- Not requred for Tasmota, publish every variable update if wantedSave and reload Luup engine, you should now get the Tasmota bridge in OpenLuup
You should also get the Tasmota device you setup above
 On my OpenLuup it got placed in the room "Tasmota".
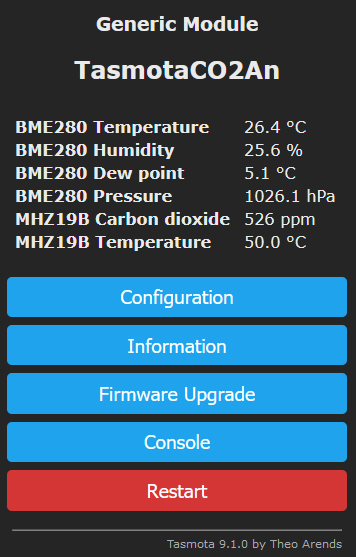
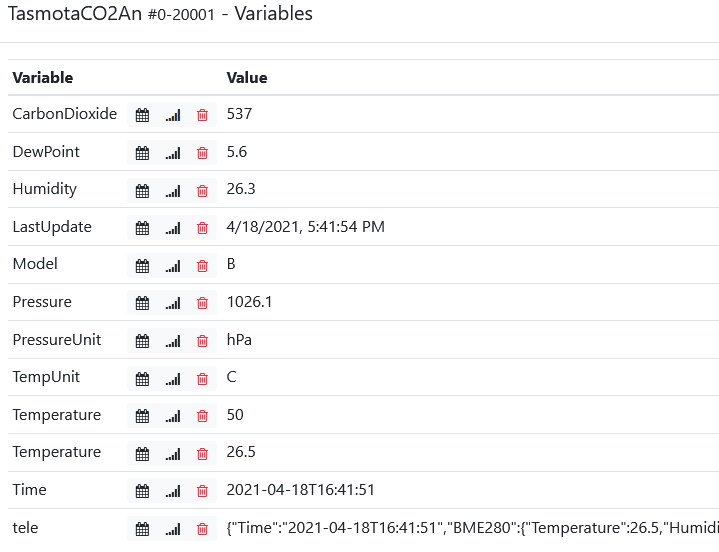
Next step is to set up devices for the sensor data you want to get from the Tasmota device. This data is pushed into variables for the Tasmota device (if you hover above a variable name you see the sensor, e.g. "BME280"):
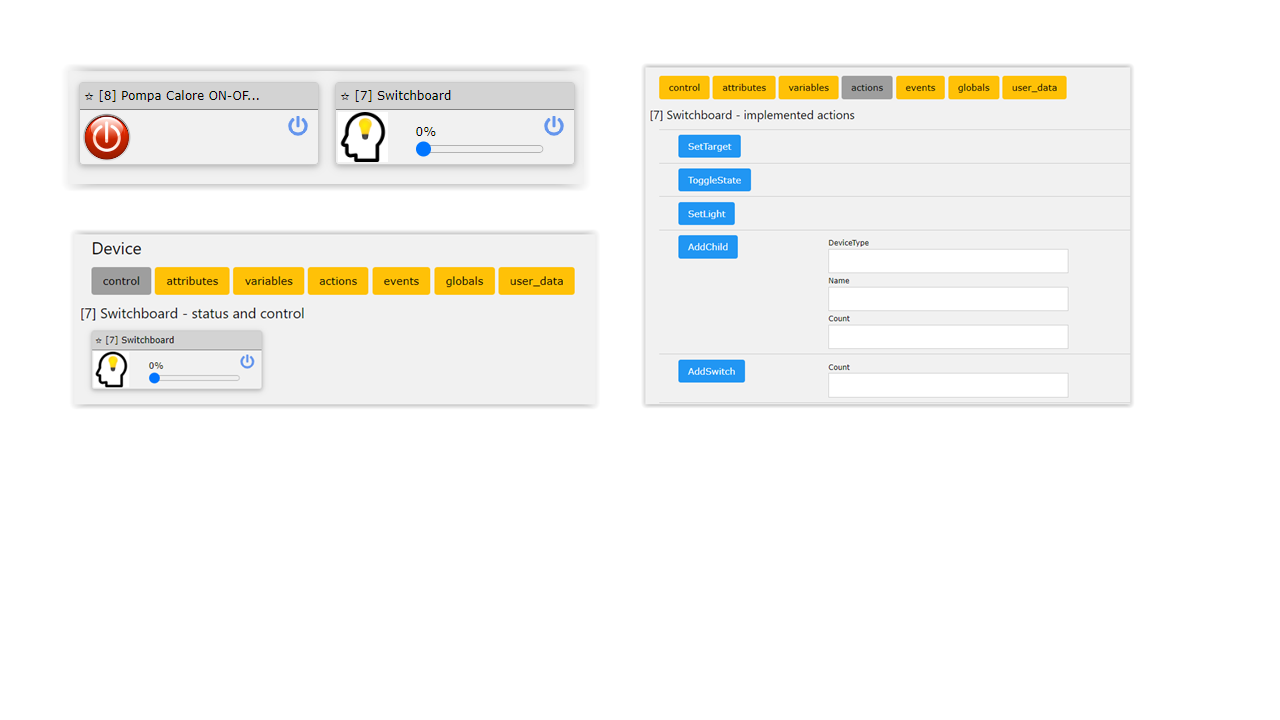
Download the plugin "Virtual Sensor" if you do not have it.
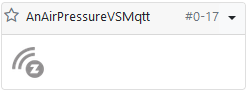
 Go into Virtual Sensors, tab "Virtual Sensors" and create the new virtual sensors you need for the data you want to display from the Tasmota device, you want one virtual sensor per value.
Next step is to set the data from the Tasmota variables to the corresponding virtual sensors.
Go into the Virtual Sensor plugin, into the tab "Virtual Sensors"
Select the Tasmota device in the first drop down and then the variable in the second: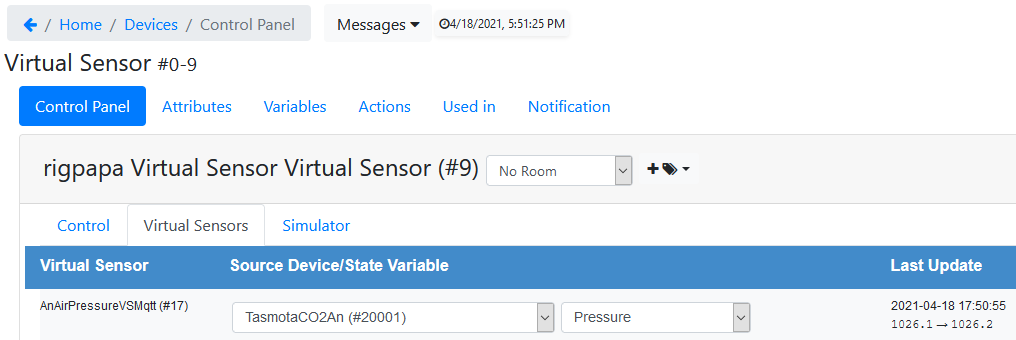
Job done! Now repeat for all the variables you wish to add into OpenLuup.
-
That’s great, thanks on behalf of all future users!
AFAIK, you don’t need to enable the PublishVariableUpdates MQTT option in order for the Tasmota bridge to work (since it is, itself, only one-way) although you may need it for other purposes.
-
That’s great, thanks on behalf of all future users!
AFAIK, you don’t need to enable the PublishVariableUpdates MQTT option in order for the Tasmota bridge to work (since it is, itself, only one-way) although you may need it for other purposes.
@akbooer said in openLuup: Tasmota MQTT Bridge:
AFAIK, you don’t need to enable the PublishVariableUpdates MQTT option in order for the Tasmota bridge to work (since it is, itself, only one-way) although you may need it for other purposes.
You are of course correct!
I edited the remark for that line in the example above.
By the way, I have tested this enabled and not enabled on my test Pi and it does not affect the cpu load as far as I could see. It stayed at 4-4.5% in both cases. -
That’s great, thanks on behalf of all future users!
AFAIK, you don’t need to enable the PublishVariableUpdates MQTT option in order for the Tasmota bridge to work (since it is, itself, only one-way) although you may need it for other purposes.
@akbooer speaking of this, are you ok if I release a simple plugin to push data from Veras to openluup UDP? I have one in my system and it’s working flawlessly. I could port it easily. I just need a flag to disable polling from VeraBridge. It’s ok to call Vera’s endpoint to update status.
-
Yes, fine with that! So you just need the existing bridge to create the devices, and control them, but use UDP to update them?
I’m doing this with scene controllers myself, at the moment.
@akbooer No errors in 2021.04.18. Thanks for this as the changes also stabilized my Mosquitto bridge connection, which tended to flop with every error message.
2021-04-18 15:29:04.173 luup.tasmota:262: Topic ignored : tele/power_ServerWork/LWT : Online 2021-04-18 15:29:04.175 luup.tasmota:262: Topic ignored : tele/power_MainVera/LWT : Online 2021-04-18 15:29:04.176 luup.tasmota:262: Topic ignored : tele/power_HAServer/LWT : Online 2021-04-18 15:29:04.177 luup.tasmota:262: Topic ignored : tele/power_SideLandscape/LWT : Online 2021-04-18 15:29:04.178 luup.tasmota:262: Topic ignored : tele/power_GarageVera/LWT : Online -
Yes, fine with that! So you just need the existing bridge to create the devices, and control them, but use UDP to update them?
I’m doing this with scene controllers myself, at the moment.
-
@akbooer No errors in 2021.04.18. Thanks for this as the changes also stabilized my Mosquitto bridge connection, which tended to flop with every error message.
2021-04-18 15:29:04.173 luup.tasmota:262: Topic ignored : tele/power_ServerWork/LWT : Online 2021-04-18 15:29:04.175 luup.tasmota:262: Topic ignored : tele/power_MainVera/LWT : Online 2021-04-18 15:29:04.176 luup.tasmota:262: Topic ignored : tele/power_HAServer/LWT : Online 2021-04-18 15:29:04.177 luup.tasmota:262: Topic ignored : tele/power_SideLandscape/LWT : Online 2021-04-18 15:29:04.178 luup.tasmota:262: Topic ignored : tele/power_GarageVera/LWT : Online -
@akbooer I am now testing my Tasmota IR Tranceiver with the Tasmota Mqtt Bridge on my test Pi running OpenLuup v21.4.29b.
Link to Tasmota IR documentation.When looking in the Console the Tasmota sends the following messages when I start it:
00:00:03 MQT: Attempting connection...
00:00:03 MQT: Connected
00:00:03 MQT: tele/TasmotaIR/LWT = Online (retained)
00:00:03 MQT: cmnd/TasmotaIR/POWER =
00:00:03 MQT: tele/TasmotaIR/INFO1 = {"Module":"Generic","Version":"9.1.0(ir)","FallbackTopic":"cmnd/TasmotaIR_fb/","GroupTopic":"cmnd/tasmotas/"}
00:00:03 MQT: tele/TasmotaIR/INFO2 = {"WebServerMode":"Admin","Hostname":"TasmotaIR-2895","IPAddress":"192.168.1.59"}
00:00:03 MQT: tele/TasmotaIR/INFO3 = {"RestartReason":"Software/System restart"}
00:00:06 QPC: Reset
00:00:07 MQT: tele/TasmotaIR/STATE = {"Time":"1970-01-01T00:00:07","Uptime":"0T00:00:09","UptimeSec":9,"Vcc":3.069,"Heap":25,"SleepMode":"Dynamic","Sleep":50,"LoadAvg":29,"MqttCount":1,"Wifi":{"AP":1,"SSId":"BeachAC","BSSId":"FC:EC:DA:D1:7A:64","Channel":11,"RSSI":66,"Signal":-67,"LinkCount":1,"Downtime":"0T00:00:03"}}
It does however not show up as a Tasmota child device in OpenLuup for some reason.
The idea is to use it for my HVAC, the following message is received when I press a button on the remote:
17:53:29 MQT: tele/TasmotaIR/RESULT = {"IrReceived":{"Protocol":"FUJITSU_AC","Bits":128,"Data":"0x0x1463001010FE0930400400000000206C","Repeat":0,"IRHVAC":{"Vendor":"FUJITSU_AC","Model":1,"Mode":"Heat","Power":"On","Celsius":"On","Temp":20,"FanSpeed":"Auto","SwingV":"Off","SwingH":"Off","Quiet":"Off","Turbo":"Off","Econo":"Off","Light":"Off","Filter":"Off","Clean":"Off","Beep":"Off","Sleep":-1}}}The other application for a Tasmota IR Tranceiver would be for regular remotes for TVs etc. A message from a regular IR remote (for a cheap Led light) looks like this:
17:56:21 MQT: tele/TasmotaIR/RESULT = {"IrReceived":{"Protocol":"NEC","Bits":0,"Data":"0xFFFFFFFFFFFFFFFF","DataLSB":"0xFFFFFFFFFFFFFFFF","Repeat":1}}