Skip to content
  • Categories
  • Recent
  • Tags
  • Popular
  • Unsolved
Collapse
Discussion Forum to share and further the development of home control and automation, independent of platforms.
A

ArcherS

@ArcherS
How to upgrade from an old version of MSR?
cw-kidC
Hello I haven't updated my installation of MSR in a very long time. Its a bare metal Linux install currently on version 24366-3de60836 I see the latest version is now latest-26011-c621bbc7 I assume I cannot just jump from a very old version to the latest version? Or can I? Thanks
Multi-System Reactor
Access control - allowing anonymous user to dashboard
tunnusT
Using build 25328 and having the following users.yaml configuration: users: # This section defines your valid users. admin: ******* groups: # This section defines your user groups. Optionally, it defines application # and API access restrictions (ACLs) for the group. Users may belong to # more than one group. Again, no required or special groups here. admin_group: users: - admin applications: true # special form allows access to ALL applications guests: users: "*" applications: - dashboard api_acls: # This ACL allows users in the "admin" group to access the API - url: "/api" group: admin_group allow: true log: true # This ACL allows anyone/thing to access the /api/v1/alive API endpoint - url: "/api/v1/alive" allow: true session: timeout: 7200 # (seconds) rolling: true # activity extends timeout when true # If log_acls is true, the selected ACL for every API access is logged. log_acls: true # If debug_acls is true, even more information about ACL selection is logged. debug_acls: true My goal is to allow anonymous user to dashboard, but MSR is still asking for a password when trying to access that. Nothing in the logs related to dashboard access. Probably an error in the configuration, but help needed to find that. Tried to put url: "/dashboard" under api_acls, but that was a long shot and didn't work.
Multi-System Reactor
VEC Virtual Switch Auto Off
S
I use Virtual Entity Controller virtual switches which I turn on via webhooks from other applications. Once a switch triggers and turns on, I can then activate associated rules. I would like each virtual switch to automatically turn off after a configurable time (e.g., 5 seconds, 10 seconds). Is there a better way to achieve this auto-off behavior instead of creating a separate rule for each switch that uses the 'Condition must be sustained for' option to turn it off? With a large number of these switches (and the associated turn-off rules), I'm checking to see if there is a simpler approach.If not, could this be a feature request to add an auto-off timer directly to the virtual switches. Thanks Reactor (Multi-hub) latest-26011-c621bbc7 VirtualEntityController v25356 Synology Docker
Multi-System Reactor
Upcoming Storage Change -- Got Back-ups?
toggledbitsT
TL;DR: Format of data in storage directory will soon change. Make sure you are backing up the contents of that directory in its entirety, and you preserve your backups for an extended period, particularly the backup you take right before upgrading to the build containing this change (date of that is still to be determined, but soon). The old data format will remain readable (so you'll be able to read your pre-change backups) for the foreseeable future. In support of a number of other changes in the works, I have found it necessary to change the storage format for Reactor objects in storage at the physical level. Until now, plain, standard JSON has been used to store the data (everything under the storage directory). This has served well, but has a few limitations, including no real support for native JavaScript objects like Date, Map, Set, and others. It also is unable to store data that contains "loops" — objects that reference themselves in some way. I'm not sure exactly when, but in the not-too-distant future I will publish a build using the new data format. It will automatically convert existing JSON data to the new format. For the moment, it will save data in both the new format and the old JSON format, preferring the former when loading data from storage. I have been running my own home with this new format for several months, and have no issues with data loss or corruption. A few other things to know: If you are not already backing up your storage directory, you should be. At a minimum, back this directory up every time you make big changes to your Rules, Reactions, etc. Your existing JSON-format backups will continue to be readable for the long-term (years). The code that loads data from these files looks for the new file format first (which will have a .dval suffix), and if not found, will happily read (and convert) a same-basenamed .json file (i.e. it looks for ruleid.dval first, and if it doesn't find it, it tries to load ruleid.json). I'll publish detailed instructions for restoring from old backups when the build is posted (it's easy). The new .dval files are not directly human-readable or editable as easily as the old .json files. A new utility will be provided in the tools directory to convert .dval data to .json format, which you can then read or edit if you find that necessary. However, that may not work for all future data, as my intent is to make more native JavaScript objects directly storable, and many of those objects cannot be stored in JSON. You may need to modify your backup tools/scripts to pick up the new files: if you explicitly name .json files (rather than just specifying the entire storage directory) in your backup configuration, you will need to add .dval files to get a complete, accurate backup. I don't think this will be an issue for any of you; I imagine that you're all just backing up the entire contents of storage regardless of format/name, that is the safest (and IMO most correct) way to go (if that's not what you're doing, consider changing your approach). The current code stores the data in both the .dval form and the .json form to hedge against any real-world problems I don't encounter in my own use. Some future build will drop this redundancy (i.e. save only to .dval form). However, the read code for the .json form will remain in any case. This applies only to persistent storage that Reactor creates and controls under the storage tree. All other JSON data files (e.g. device data for Controllers) are unaffected by this change and will remain in that form. YAML files are also unaffected by this change. This thread is open for any questions or concerns.
Multi-System Reactor
Oddness in Copy/Move of Reactions
G
Topic thumbnail image
Multi-System Reactor
[Solved] function isRuleEnabled() issue
CrilleC
Topic thumbnail image
Multi-System Reactor
[Reactor] Problem with Global Reactions and groups
therealdbT
Topic thumbnail image
Multi-System Reactor
Possible feature request 2?
CatmanV2C
Just another thought. Adding devices from my Home Assistant / Zigbee2MQTT integration. Works perfectly but they always add as their IEEE address. Some of these devices have up to 10 entities associated, and the moment they are renamed to something sensible, each of those entities 'ceases to exist' in MSR. I like things tidy, and deleting each defunct entity needs 3 clicks. Any chance of a 'bulk delete' option? No biggy as I've pretty much finished my Z-wave migration and I don't expect to be adding more than 2 new Zigbee devices Cheers C
Multi-System Reactor
Reactor (Multi-System/Multi-Hub) Announcements
toggledbitsT
Build 21228 has been released. Docker images available from DockerHub as usual, and bare-metal packages here. Home Assistant up to version 2021.8.6 supported; the online version of the manual will now state the current supported versions; Fix an error in OWMWeatherController that could cause it to stop updating; Unify the approach to entity filtering on all hub interface classes (controllers); this works for device entities only; it may be extended to other entities later; Improve error detail in messages for EzloController during auth phase; Add isRuleSet() and isRuleEnabled() functions to expressions extensions; Implement set action for lock and passage capabilities (makes them more easily scriptable in some cases); Fix a place in the UI where 24-hour time was not being displayed.
Multi-System Reactor
Genuinely impressed with Zigbee and HA / Reactor
CatmanV2C
Just for the record, in case anyone is following, I'm really rather impressed. I have installed one of these: https://www.amazon.co.uk/dp/B0B6P22YJC?ref=ppx_yo2ov_dt_b_fed_asin_title&th=1 That's connected (physically) to the VM running on my Synology, with a 2m USB extension. The same host also runs Openluup, Mosquito, HA Bridge. Yesterday I installed Zigbee2mqtt. That was a bit of a PITA but mostly because of ports and permissions. Once up and running, and the correct boxes ticked, immediately visible in Home Assistant via the MQTT integration, and thence into Reactor I've only got two devices. I bought the cheapest sensor I could find, which is a door sensor. Dead easy to add to ZIgbee2mqtt and again, immediately visible in HA. https://www.amazon.co.uk/dp/B0FPQLWRW1?ref=ppx_yo2ov_dt_b_fed_asin_title The dongle is on the top floor of the house, and I wanted the sensor on the back door (just about as far apart as it's possible to get short of going into the garage) When I moved the sensor downstairs it dropped out pretty instantly (which wasn't a huge surprise) so quick bit of research found out that smart plugs will act as routers so... https://www.amazon.co.uk/dp/B0FDQDPGBB?ref=ppx_yo2ov_dt_b_fed_asin_title Took me about 30 seconds to connect. Updated the name. Instantly visible in Reactor with the new name pushed over from Zigbee2mqtt. And lo, the door sensor now has a signal of 140 and works as far as I can tell perfectly and instantly (unlike my z-wave one). A few more of those will be purchased and used to replace the Tuya wifi cloud devices and the (continually failing) Z-wave plugs (yeah, they were TKB so....) Commended to the house. Thanks for everyone that got me on the right lines. C
Zigbee
Copying a global reaction
tunnusT
With build 25328, if you copy a global reaction, a new reaction does not appear in the UI unless you do a refresh. I recall this used to work without needing this page refresh? Anyway, only a minor nuisance.
Multi-System Reactor
[HowTo] Using HABridge with Reactor
therealdbT
If you’re like me and still running HABridge to control your devices locally via Alexa, you might need to tweak your endpoints to call Reactor via HTTP. Here’s the best way to do it, IMO: Insert the Reactor Canonical ID (e.g., zwavejs>71-1) into the MapID field, but make sure it’s URL-encoded like this: zwavejs%3E71-1. Then, configure these endpoints as needed: On: http://[ReactorIP]:8111/api/v1/entity/${device.mapId}/perform/power_switch.on Off: http://[ReactorIP]:8111/api/v1/entity/${device.mapId}/perform/power_switch.off Dim: For lights: http://[ReactorIP]:8111/api/v1/entity/${device.mapId}/perform/dimming.set?level=${intensity.decimal_percent} For roller shutters: http://[ReactorIP]:8111/api/v1/entity/${device.mapId}/perform/position.set?value=${intensity.decimal_percent} Color: http://[ReactorIP]:8111/api/v1/entity/${device.mapId}/perform/rgb_color.set_rgb?red=${color.r}&green=${color.g}&blue=${color.b} Just replace [ReactorIP] with your actual IP address. By using these placeholders, you can standardize your endpoints across all devices, making maintenance easier. This setup works with any device mapped under MSR, regardless of the controller (ZWaveJS, Vera, HASS, OpenSprinkler, virtual, MQTT, DynamicEntities, etc.). If you need different calls, just go to the entities, get the action and parameters, and adjust accordingly. Enjoy super fast access to your devices via Alexa! If you're migrating from Vera, the endpoints are (URL-encoded) in a file called device.db, in JSON format, under your config. You'd write a script to align the new endpoints to the new one, if you prefer to do it automatically. YMMV.
How-To
[Reactor] Bug when sending MQTT boolean payloads
therealdbT
Topic thumbnail image
Multi-System Reactor
Difficulty defining repeating annual period
R
I have tried numerous ways to define a recurring annual period, for example from December 15 to January 15. No matter which method I try - after and before, between, after and/not after, Reactor reports "waiting for invalid date, invalid date. Some constructs also seem to cause Reactor to hang, timeout and restart. For example "before January 15 is evaluated as true, but reports "waiting for invalid date, invalid date". Does anyone have a tried and true method to define a recurring annual period? I think the "between" that I used successfully in the past may have broken with one of the updates.
Multi-System Reactor
Need help with sequence
T
Good evening all, For about the past week or so, I've been having problems with a specific rule in my home automation that controls when my home goes from an Away mode to Home mode. One of the conditions it checked for was my alarm panel, when it changed from Armed Away to Disarmed. There seems to have been a firmware update on the panel that added an intermittent step of "pending", and I can't say for certain it happens 100% of the time. Is there a way to write a condition that so it changes from one condition, to the next, and then another condition? As in, Home alarm changes from armed_away to pending to disarmed. Thanks.
Multi-System Reactor
Possible feature request?
CatmanV2C
No idea how easy this would be. During my migration away from Z-wave I've been replacing the Z-wave devices with Sonoff which has broken some of my automations. Any chance of a 'Test Reaction' function to call out which ones are broken because an entity no longer exists? Without actually running the reaction? Or does this exist already and I'm just not aware of how to do it? Obviously I can see entities that are no longer available, but not quite what I'm looking for. I guess it's something of an edge case so no huge issue. TIA! C
Multi-System Reactor
Logic Assistance: Exterior Lights on when Illuminance Below Threshold
PablaP
Topic thumbnail image
Multi-System Reactor
Time series documentation
tunnusT
Is the current manual (incl. examples) up to date with how retention value is handled in time series configuration? Referring to this post
Multi-System Reactor
MQTT templates for ZIgbee scene controller, or a better way?
CatmanV2C
Topic thumbnail image
Multi-System Reactor
Reset a delay
CatmanV2C
I'm sure this has been asked, and answered, but damned if I can figure it out Use case: I have a rear garden with lights. A door from the kitchen into the garden and a door from the garage. Currently if I open the kitchen door the lights come on (yay) and a 3 minute delay starts. After 3 minutes, no matter what else happens, the lights go off (Boo! But also yay!) What I would like is for the 3 minute delay until the lights go off to start from the latest door open event. That is, if I'm going from kitchen to garage, and back again, the lights stay on until there's three minutes of no activity. I've tried 'hacking' with a virtual switch, but can't seem to stop the delay. Any pointers? TIA C
Multi-System Reactor
About
Posts
258
Topics
10
Shares
0
Groups
0
Followers
0
Following
0

Posts

Recent Best Controversial

  • openLuup: Tasmota MQTT Bridge
    A ArcherS

    Thought it could be good for future users to give a short write up on how to set up Tasmota devices reporting sensors into OpenLuup with the new Tasmota bridge.

    First setup the Tasmota device:
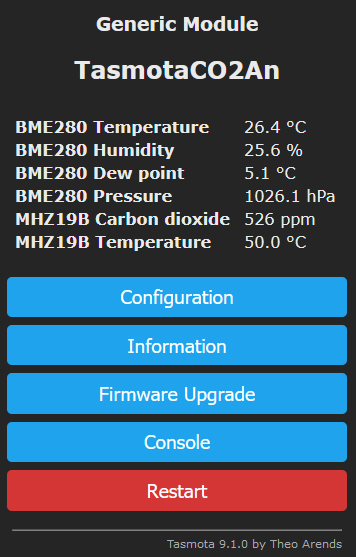
    Browse to the Tasmota device IP and then select "Configuration"
    5037d753-42b7-4014-a4d9-1fd120adfcbb-image.png Go into Configuration Other
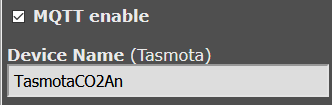
    Make sure "Mqtt enable" is set and give a Device Name
    61776069-bf6e-4d2d-b9a5-95451c08b62c-image.png 
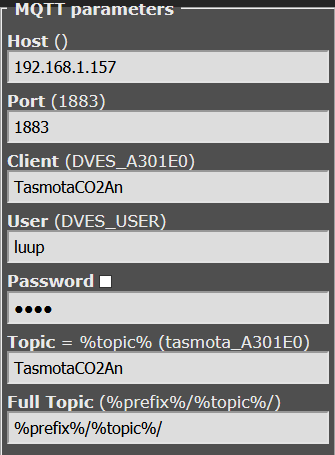
Then into Configuration MQTT
    Give IP adress and port of OpenLuup Mqtt server
    Give a Client name
    Set user and password
    Set topic name
    701d2925-8897-4a7b-8bac-55f13654213b-image.png

    If you want to change how often the Tasmota device pushes data over Mqtt you can do that in the Console for the Tasmota by using the "TelePeriod" command. By default TelePeriod is set to 300 seconds, e.g. "TelePeriod 60" sets it to once every minute. (Just typing "TelePeriod" shows the current value.)

    Second set up OpenLuup:
    Paste the following into Lua Startup:

    luup.attr_set ("openLuup.MQTT.Port", 1883)
    luup.attr_set ("openLuup.MQTT.Username", "luup")
    luup.attr_set ("openLuup.MQTT.Password", "password")
    luup.attr_set ("openLuup.MQTT.PublishVariableUpdates", true) -- Not requred for Tasmota, publish every variable update if wanted
    

    Save and reload Luup engine, you should now get the Tasmota bridge in OpenLuup
    218be9a6-ec10-471a-8e96-65e2462e2d5c-image.png

    You should also get the Tasmota device you setup above
    9eb70057-37e2-4f77-a4c1-2dc5462d5840-image.png On my OpenLuup it got placed in the room "Tasmota".

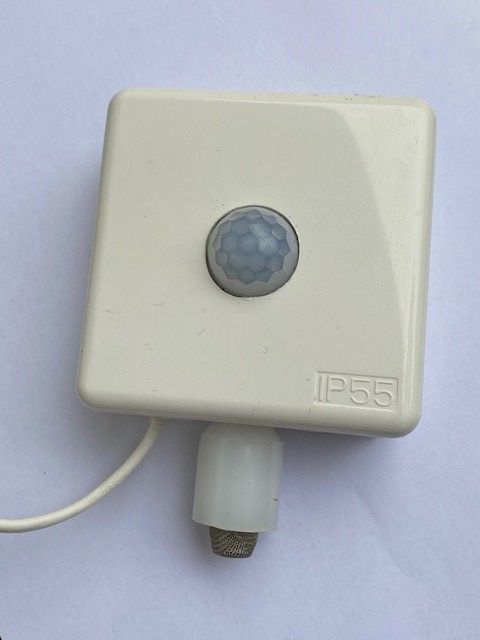
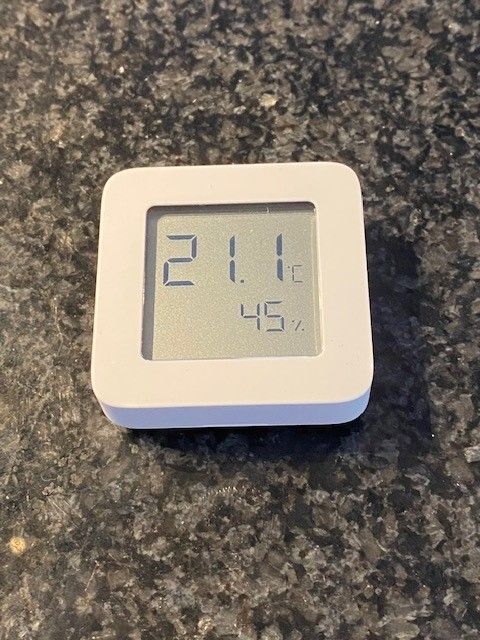
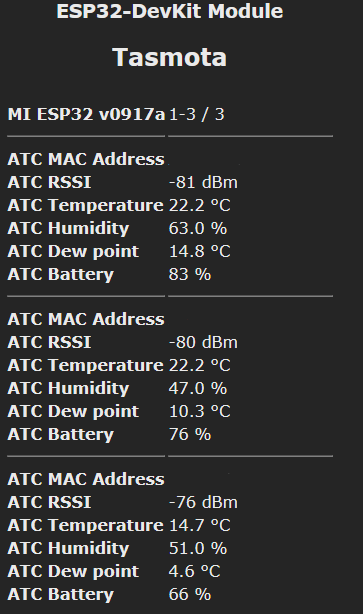
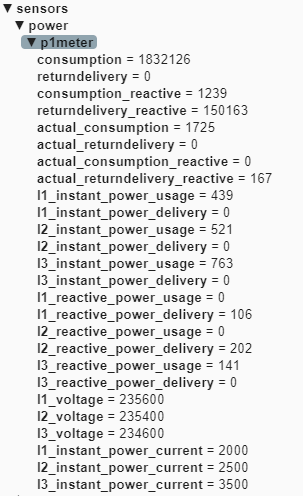
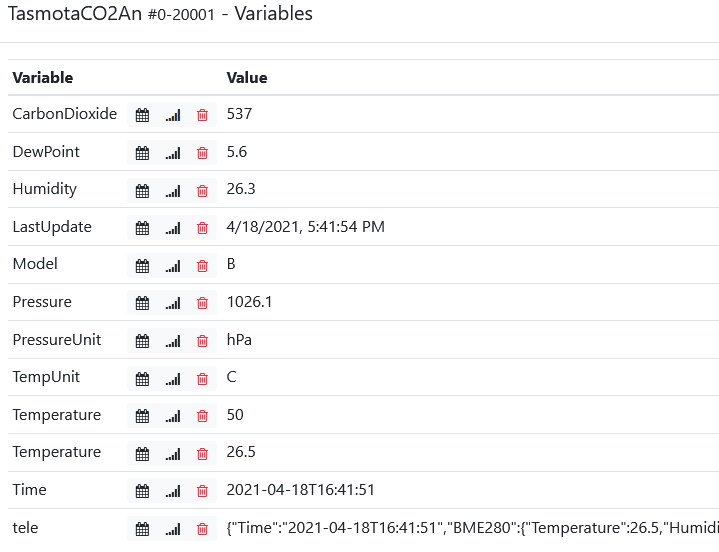
    Next step is to set up devices for the sensor data you want to get from the Tasmota device. This data is pushed into variables for the Tasmota device (if you hover above a variable name you see the sensor, e.g. "BME280"):
    47c8cd4f-bd2d-499c-86db-0903c792c753-image.png

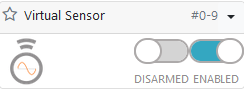
    Download the plugin "Virtual Sensor" if you do not have it.
    099ba5c9-a5f5-4200-ba6e-5f8d32021544-image.png Go into Virtual Sensors, tab "Virtual Sensors" and create the new virtual sensors you need for the data you want to display from the Tasmota device, you want one virtual sensor per value.
    4deddfff-45bf-4af5-9379-1f45a1ab6644-image.png

    Next step is to set the data from the Tasmota variables to the corresponding virtual sensors.
    Go into the Virtual Sensor plugin, into the tab "Virtual Sensors"
    Select the Tasmota device in the first drop down and then the variable in the second:

    6ba15680-9d35-41bb-a2e2-df5d85115094-image.png

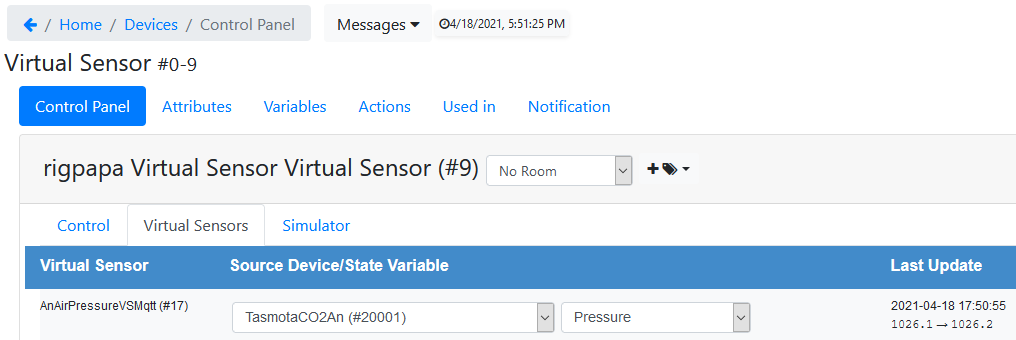
    Job done! Now repeat for all the variables you wish to add into OpenLuup. 🙂

    Plugins

  • Tinkering with Tasmota sensors
    A ArcherS

    @therealdb I built my outdoor sensor from what I had in the garage, very much DIY in other words. 🙂
    I used an outdoor junction box, to this I hot glued a plastic dome from an old motion sensor for the light sensor. I also added a short piece of plastic pipe for the BME280 so that it is outside of the box to get better readings. To keep spiders etc out of the pipe I added an old stainless mesh dome to the end of it.
    In the box is also a 240V/5V transformer.

    The intention is to mount it on the north wall of the house outside of the sun. At the moment it is laying on the window sill.
    utesensor.jpg

    Some more small tips on rules:
    It is possible to create up to three rules for each sensor.
    It is possible to have several "Do" stamements in each rule.
    Rule<x> ON <trigger1> DO <command> ENDON ON <trigger2> DO <command> ENDON ...

    It is very easy to find out the name of each sensor for using in the rules by looking at: http://IP_address/cm?cmnd=Status%2010

    A rule is defined by pasting the rule from e.g. notepad to the Console window of the sensor.
    After that the rule needs to be enabled by Rule1 1, Rule2 1 etc.
    After enabling a rule check in the console that the rule is sending values.
    A rule is deactivated by Rule1 0 etc.
    To see the contents of a rule just type Rule1 etc.
    To delete a rule type Rule1 " etc.

    My recommendation is for people to look at the Tasmota rules documentation, it is very good.
    .
    //ArcherS

    Hardware

  • Help with Z-Way plugin
    A ArcherS

    Thank's for a really quick reply! That indeed did the trick, I knew it was something easy I missed.
    Now I just need to go through my Reactors and re-map my z-way devices. Not too much work.

    //ArcherS

    Zway Bridge

  • Remotec ZRC90
    A ArcherS

    Checked with v20.7.14 and the "sl_CentralScene" variable is updated with the key pressed.

    Thanks again for the update! 🙂

    openLuup

  • Tinkering with Tasmota sensors
    A ArcherS

    Some time ago I stumbled on some rather nice looking temperature and humidity sensors from Xiaomi and how to get them to communicate with a Tasmota ESP32 with BLE.

    Xiaomi temp sensor.jpg

    I ordered an ESP32 on Ebay and a three-pack of the sensors from Bangood. The sensors are quite cheap, you can find them for €4-5 in the usual sites.

    The sensors are quite small, approx 4.5cm and run on a CR2032 battery. Time will tell how long the batteries will last. With the custom firmware you can change the reporting interval.

    I have now been running this for little over two months and it works surprisingly well, bringing the temperature and humidity data into OpenLuup.

    In short what you do is the following:

    • Download the beta Tasmota for ESP32, flashing is a bit different from the regular Tasmota but pretty straight forward

    • Enable bluetooth with setoption115 1

    • The Xiaomi sensors can used both with stock firmware and flashed with a custom firmware that removes the encryption from the transmit of data, I flashed them with a Win10 laptop and it was super easy. You can even roll back the original firmware if you want.

    The Xiaomi sensors will then be included by the ESP32 Tasmota device and can be sent to OpenLuup with rules, brought in with Sitesensor or now via MQTT.

    73f83e12-af75-458a-b021-cd9d413260fc-image.png

    Hardware

  • External antenna on razberry board
    A ArcherS

    It seems as if it is possible to modify it with an external antenna.
    Here is an article on how to modify the Razberry2 EU:
    Modify Razberry2 (translated)

    Is is in Swedish, hopefully the translated text is understandable. 🙂
    In short you cut away the built-in antenna and solder on an antenna connector for the external antenna. You of course need an antenna for the frequency in your country, the article is for 868 MHz (EU).

    //ArcherS

    Z-Wave.me

  • Easy way to convert to SSD from SD card on Pi with MSR
    A ArcherS

    @matteburk if you have a Pi 3B+ then you are in luck since it will boot from USB without doing anything.
    If it is a Pi 3B then you have to change a "USB boot bit", see e.g. this instruction.

    I took the easy route and bought a new Pi 3B+ when I moved my Z-way server to SSD from SD. They are quite cheap anyway and I guess I can get use of the Pi 3B for something else later on.

    As @toggledbits says the Pi's are a bit picky on SSD adapters. I had two old 2.5" cases laying around, one worked and the other did not. The SSD migration cable that came with a Samsung SSD that I used for another PC also works.

    Edit: And if you buy a new Pi 4 they should now also have USB boot out of the box. Assuming the box has not been sitting on the shelf in the store for too long of course. 🙂

    General Discussion

  • openLuup: MQTT server
    A ArcherS

    @akbooer thanks for the assistance and patience, now it works! 🙂

    Edit: Added the humidity to the code:

    local json = require "openLuup.json"
    
    function MyMQTThandler (topic, message)
      local info = json.decode (message)
      local t = info.AM2301.Temperature
      local h = info.AM2301.Humidity
      luup.variable_set ("urn:upnp-org:serviceId:TemperatureSensor1", "CurrentTemperature",  t, 216)
      luup.variable_set ("urn:micasaverde-com:serviceId:HumiditySensor1", "CurrentLevel",  h, 228)
    end
    
    luup.register_handler ("MyMQTThandler", "mqtt:tele/tasmota_test/SENSOR")
    
    openLuup

  • Tinkering with Tasmota sensors
    A ArcherS

    @buxton yes it opens up new possibilities. On the Tasmota bluetooth webpage some other devices are listed, e.g. a soil humidity meter.

    So far it has been quite stable for more than two months.
    The Tasmota ESP32 is still beta, I assume it will get better over time.

    I will also make the ESP32 to report over Mqtt now that OpenLuup has support for it, hopefully that will make the setup even more stable.

    Hardware

  • Luup reload required after server reboot
    A ArcherS

    @rafale77 I tried this way of delaying at startup and it works fine. It does not cause delays when reloading luup which is a clear benefit.

    openLuup

  • P1 electrical smart meter reader
    A ArcherS

    About one month ago I got a new electrical meter in the house. The new meter is a "smart" meter equipped with a data port. It is more or less the same type of meter that is used in a number of European countries, e.g. The Netherlands, Belgium, Sweden etc.
    Norway has selected a different version with a RJ45 port with another protocol.

    The dataport is a serial "P1" port in the form of a RJ12 contact that sends quite a lot of data every 10 seconds:
    c716b64e-dcac-4ea4-9b1b-8ee29eb55edc-image.png

    The data will show both consumption and production if you e.g. have solar panels at home.

    My initial though was to use the Tasmota P1 Smart Meter with Mqtt. I tried this and it works, but unfortunately I got some serial data errors every 5-10th message for some reason so I decided to try another solution.

    I found a few other alternatives and tested one of them. The upside with this version is that it is adapted to the Swedish data fomat that differs from the Dutch a bit and that it delivers the data in Mqtt form:
    2aab179b-a9ea-4041-8c38-f73570206e11-image.png

    The hardware is pretty simple. For the Tasmota variant and most of the other solutions you need a ESP8266, e.g. a Wemos mini and then a transistor and two resistors (image below). The version I use is even simpler since it does not need the transistor.
    For a lot of the meters delivered (DSMR 5 versions if I am right) you can power the ESP from the 5V provided in the RJ12 port, very handy.

    42092756-f6b3-4375-9000-04bcd1e22240-image.png

    It is also possible to buy a readymade P1 meter, this one looks quite nice, although I have not tested it.

    In order to get a good overview of the data from the meter I have started creating a dashboard in Grafana that gets data from Historian in OpenLuup. It is quite useful to be able to see the load over time per phase etc.
    a8276d7b-6b39-4f3a-a663-353173c1da5b-image.png

    I also managed to grab the hourly prices in json format and display that in the dashboard via some lua code in a scene.

    At the moment I have built no logic around this, but it opens up posibilities for sure. In Sweden the electrical tarrifs will change from daily rates to being higher when demand is higher, perhaps then this can be used.

    All in all a fun DIY project that provides some useful data out of the electrical meter. 🙂

    Hardware

  • OpenLuup installation
    A ArcherS

    That did the trick! 🙂

    Alpine and Docker, need to look at that also later on. 🙂

    Thank's @CatmanV2 and @akbooer for your swift help!

    openLuup

  • Messaging after VERA decoupling
    A ArcherS

    @droy I use the excellent Telegram plugin by @therealdb in OpenLuup, it should work on the Vera also.

    Vera

  • Power monitoring options
    A ArcherS

    Like @Crille I have an electrical meter with a P1 data port. I use a DIY ESP8266 reader that I described some time ago in this thread. Since writing my post I have changed the software on the ESP, the version I am using now publishes the meter data approx every 10s as a json.

    A good wifi solution for the whole house if lacking a dataport is to use a Shelly 3EM. It is a three clamp meter that can measure all three incoming phases, assuming you have that. I have a few of these for measuring both single and multiple phase consumers, e.g. a two-phase water heater. It reports both energy, power, voltage and current per phase.
    The only downside I can see is that the clamps are a bit big, so some space is required to get them in place around the incoming power lines.

    Vera

  • Telegram Plug-in to send text, images and video notifications
    A ArcherS

    @therealdb thank you for the update!

    I have tried it and it does not quite work.
    The Lua code is executed ok (with the added comma as below), and I get a message in Telegram.
    The text is ok, however instead of getting an image I get "camsnapshot117439654.gif" (the number is different each time). The gif does not seem to contain anything.
    The url I call generates a .jpg file, I do not know why arrives as an empty .gif.

    Any ideas?

    (Btw, there is a small typo in the luup.call_action, the comma is missing after the VideoUrl line. It should be:)

    luup.call_action("urn:bochicchio-com:serviceId:VeraTelegram1", 
      "Send",
      {
         Text="This is a protected endpoint!",
         VideoUrl="https://media.giphy.com/media/3o84sIqsVAJNfWyjy8/giphy.gif",
         UrlParams="--digest -u daniel:secret" -- <== curl parameters!
      }, 515)
    

    //ArcherS

    Plugins

  • Remotec ZRC90
    A ArcherS

    I included a ZRC90 remote to Z-way. The inclusion was without problems, and in Z-way you can see what button is pressed.

    In OpenLuup I get the same variables as Catman has listed above. I tested and the two variables "zway_61-0-91-DS" and "zway_61-0-91-DS_LastUpdate" on the remote device are updated on key presses.

    Depending on what you press "zway_61-0-91-DS" get the following values:
    Btn 1 single press: 10
    Btn 2 single press: 20
    ...
    Btn 8 single press: 80

    Btn 1 double press: 13
    Btn 2 double press: 23
    ...
    Btn 8 double press: 83

    Btn 1 press&hold: 11
    Btn 2 press&hold: 21
    ...
    Btn 8 press&hold: 81

    Each time a button is pressed zway_61-0-91-DS_LastUpdate is also updated with a new time.

    So far so good, the above two parameters gives the possibility to capture the various key presses on the ZRC90.

    What does not work is that I get the same problem as I did for the Zwave.me wall controller, i.e. that the two variable are not updated in Reactor on key presses.
    @akbooer is this something that can be fixed?

    I am running OL 20.7.4b and Z-way plugin 20.5.12.
    (The key presses on the Zwave.me wall controller are still working.)

    //ArcherS

    openLuup

  • Grafana on Docker
    A ArcherS

    @akbooer I am on 7.3.1 and what I have done is to add links on the top of the pages to navigate between them.
    The link buttons work pretty well also on an iPad or even on the phone.

    //ArcherS

    Docker

  • Telegram Plug-in to send text, images and video notifications
    A ArcherS

    @therealdb now it works!

    For my Axis camera that seems to require Digest mode for curl authentication I use the following to send an image:

    luup.call_action("urn:bochicchio-com:serviceId:VeraTelegram1", 
      "Send",
      {
         Text = "Motion in garage", 
         ImageUrl = "http://192.168.x.x/jpg/image.jpg",
         UrlParams = "--digest -u daniel:secret"
      }, 515)
    

    Thanks for the addition to an already nice plugin!

    //ArcherS

    Plugins

  • Remotec ZRC90
    A ArcherS

    I updated to v20.7.12 and it works partially! 🙂

    "LastSceneTime" is updated every time you press a key, so that one works.

    "sl_CentralSceneUpdates" however stays "null" all the time.

    On the ZRC90 that I still have on the Vera there is a variable called "sl_CentralScene" but no variable called "sl_CentralSceneUpdates". I do not know if this could be the reason.

    As a side note the variables "zway_61-0-91-DS" and "zway_61-0-91-DS_LastUpdate" are now updated instantly in Reactor.
    So a functional workaround could be to use the "zway_61-0-91-DS" and "LastSceneTime" variables for capturing keys pressed in e.g. Reactor. I did a quick test and it seems to work.

    openLuup

  • Home water pressure sensor
    A ArcherS

    One solution that I can think of is to use MySensors. https://www.mysensors.org/
    This is a DIY community platform for making sensors etc. It is supported by Vera and OpenLuup, @akbooer is using it if I am not wrong.

    I found someone that had made a water pressure sensor that you perhaps could have a look at for inspiration: https://forum.mysensors.org/topic/8731/water-pressure-sensor/1?_=1590472756396&lang=en-US

    In short with MySensors you set up a gateway and then the sensors you want. Each node is an Arduino or similar. I used an USB connected gateway with my Vera, but an Ethernet connected gateway is needed for OpenLuup.

    I set it up a number of years ago on my VeraLite and it actually worked really well. I used it mainly for simple temperature sensors. I stopped using it because of that each time the Vera rebooted the gateway was lost, and I had to re-discover it on the Vera USB port. Quite a bit of hazzle since the Vera had a tendency to reboot quite a lot.

    If I get some time I may have a go at restarting MySensors now that I am using OpenLuup since it would be a good way to add dirt-cheap sensors to the system.

    Hardware
  • Login

  • Don't have an account? Register

  • Login or register to search.
  • First post
    Last post
0
  • Categories
  • Recent
  • Tags
  • Popular
  • Unsolved