


Cheapest platform on which to run MSR
-
Please can anyone give me advice on a cheap way to run MSR (both initial cost and ongoing electricity cost). I currently run it on my QNAP network drive (which works very well incidentally). However, this draws a constant 35Watts (£90/yr @ 30p/kWh) and given the recent rise in fuel costs I am evaluating the best way forwards. Note, I only really need to turn my QNAP on for an hour a week to back-up my computer data. I understand that MSR can run on a Raspberry PI, but I am not competent with Linux! Thanks.
-
RPis are, I think, a good alternative. But, you're not likely to find much that is price-competitive with RPis that has a management GUI like the QNAP to reduce the learning curve. My advice to you would be to learn some basic Linux command line stuff and get fluent. This a good place to do it. The RPi is a good platform to do it on. If you make good backups, you really won't set yourself back very much if you end up wrecking something accidentally. As they say, the best time to start was yesterday; the second best time is now.
A 2GB RPi 4B+ runs about USD45 right now. You absolutely can run on 1GB if you don't run too much alongside (e.g. no InfluxDB, for example, although an MQTT broker would probably not be much of an issue), and that would get you down to USD35. I have run successfully on a 512MB 3B+ as well.
Continuing in that direction, I strongly recommend that you use a real SSD rather than a MicroSD card. The latter is not usually designed for the high write cycles of a typical Linux system. You may do fine with one of the camera-targeted MicroSD cards (""high endurance"), at least for a while. Capacity can be small; 8 or 16GB would suffice, so you're in a cost-effective range, and that may hold you for a while until you can upgrade to SSD. Going to an SSD, you would need not only the SSD, but a USB3.1 to SATA interface; the latter runs about USD15 on Amazon, and make sure you get a true USB3.1 version (there are two very similar, one is only USB3.0 and was previously not supported by the Pi firmware, although it may be now; there's a compatibility list published somewhere; we can dig later if you need it). Cheap small SSDs run <USD30 on Amazon, and I even found a five-pack of 64GB for USD18 (you may get a surprise later from the Department of Getting What You Pay For).
In terms of power, it's going to be in the 5-10W range depending on what it's doing, so I think worst-case, you're down to about a third the energy cost, but in the first year, the hardware cost will eat up the difference.
@toggledbits new Raspberry PI are in short supply here in the UK and therefore quite expensive. I have come across a Raspberry PI 2. Do you think this is worth a try or is it a non-starter from the off? Thanks.
-
No, a Pi 2 won't do it. Well, you probably could, but I don't recommend it and I haven't tried it. A 3B+ is workable. I've tested that, so that's the safest minimum I can recommend.
I've had trouble getting Pis as well for multiple projects, but I recently found rpilocator.com and I can highly recommend it. If you follow them on Twitter you can basically get alerts from them and it helps. You need to be quick. Yesterday they reported over 100 units available from a popular US seller, and today that seller is reported out of stock.
I recently managed to get a Compute Module 4 with 8GB EMMC (built-in Flash storage like an SSD). That ran me US$45 for the CM4, and another $40 for the I/O board on which you mount it. I am testing that right now, and will likely use it as my build system for 64-bit Raspbian Bullseye releases (coming soon). It's much tidier than fussing with the USB-SATA adapter. That is all equivalent to a 4B+ in power, and may be equivalent or even a little lower in price -- by the time you've purchased a Pi 4B+ with 2GB RAM, an 8GB or larger SSD, and the USB 3.1 to SATA interface, you're in the same price range. Either way you go, the investment is a computing platform you can use for a long time; they've got good power, are well-built little boards (all), etc.
Also, for any configuration with less than 2GB RAM, I recommend using the "Lite" version of the OS install (no desktop/GUI, command line only). That would include the 3B+.
-
Raspberry Pi's are in short supply (scarce) and also costly now, thanks to the chip shortage.
Also the power supply is VERY important, a phone charger won't cut it especially on the most recent Pi4, I swapped an V1 Pi4 out with a new and now more expensive Pi4 yesterday and couldn't get it to boot on the old Power Supply. It was doing my head in until I swapped it for a 2.4A Inline charger.
This brings me to what I was going to start a new thread on but you beat me to it.
What are are alternatives to a Pi4? -
I'm not seeing that, at least, not here in the States, among the usual major sellers, they all seem to be sticking to normal pricing when they have product (Adafruit, Arrow, Pishop, Digi-Key, etc.). It has been reported that Raspberry is focusing on its commercial customers first, so their production has leaned more into the Compute Modules than the standalone boards, but you can still get them, and I look at that availability of 100 at Adafruit as a good sign -- it was the largest single block of product I've seen in a while. They sold off the 2GB RAM models at US$45 each, which has been MSRP since release. There are a few opportunistic new/pop-up vendors (on eBay especially, to the surprise of no one, I hope) digging for gold, but the majors seem to be toeing the line.
-
So I have taken the plunge and ordered a RPI 4 4gb with USB 3.1 cable and SSD (paid a bit over the odds, but was having no success with the approved suppliers!). No going back now! Do I install Raspbian OS? I appreciate it'll have been a while since a lot of you guys learnt linux, but can anyone recommend where I might start - i.e. a book or internet site? Thanks.
-
I'd go for Raspian
https://www.raspberrypi.com/software/It's a dead simple set up with the imager (no reason you shouldn't be able to use the SSD with that) The server version should give you everything you need but being based on Debian it should be trivial to get any missing bits (like curl and NodeJS 16). I also am running Debian 10 and have just set up MSR on a Debian 11 VM so more than happy to help until a proper expert comes along
")
C
-
Agree, best at this point would be Raspbian Bullseye, which is available as a 64-bit distribution that will maximize the performance of the host. If you choose to run Reactor under docker rather than bare-metal install, there are now 64-bit (
aarch64) images available of Reactor.IIRC, you have to bring the system up on a MicroSD card as usual, and then you can use
raspi-configto reconfigure it to boot from the SSD. That basically means you will need to install the OS twice, in advance before your first boot... once on the MicroSD, and once on the SSD. Once it's booting from the SSD, you can (and should) remove the MicroSD card. There are several different instructions for this available by search; some will give you steps to simply copy the OS from the MicroSD to the SSD, which is fine, too.Also, I believe that starting with Bullseye builds in March 2022, the default
piuser is no longer included in the distribution — a user had to be created during the first boot. That means you will have to have a monitor (HDMI) and keyboard (USB) connected (and mouse if using the GUI). Also note that most instructions for Pi things tend to assume that thepiuser exists and is the first user on the system, so you may want to go with that when asked. -
With the new Raspberry Pi Imager you can configure the boot sequence and user when you download (format) the card or SSD.
Click on the settings Icon (lower righthand side) that will give you access to setting User Names, SSH and more..
Make sure you use the Rasp Pi downloader for this and its a breeze.I suggest you just throw caution to the wind and buy a SSD, they aren't that much more expensive than a SD Card.
The Pi4 makes it all worth while -
With the new Raspberry Pi Imager you can configure the boot sequence and user when you download (format) the card or SSD.
Click on the settings Icon (lower righthand side) that will give you access to setting User Names, SSH and more..
Make sure you use the Rasp Pi downloader for this and its a breeze.I suggest you just throw caution to the wind and buy a SSD, they aren't that much more expensive than a SD Card.
The Pi4 makes it all worth while@black-cat TOTALLY agree on the SSD. I found a three-pack on AMZ for a very reasonable cost and haven't looked back. Everything runs much smoother/faster than on the SD card (for obvious reasons) and the knowledge that I'm not facing a SD card failure is reassuring.
-
Thanks for all the suggestions and support. I have a 16 GB SSD coming (based on advice given). I was hoping to install the OS directly as I don't have a SD Card. Still, it's a small problem if that all that is stopping me. I was thinking of using (installing?) a Docker so that I can install other applications too, but would this be too much to bite off for a beginner?
Vera plus user. MSR user on Raspberry PI 4. Running MSR version 23049 in Docker
-
Thanks for all the suggestions and support. I have a 16 GB SSD coming (based on advice given). I was hoping to install the OS directly as I don't have a SD Card. Still, it's a small problem if that all that is stopping me. I was thinking of using (installing?) a Docker so that I can install other applications too, but would this be too much to bite off for a beginner?
@talisker said in Cheapest platform on which to run MSR:
I was thinking of using (installing?) a Docker so that I can install other applications too, but would this be too much to bite off for a beginner?
I recommend it. It takes away a lot of details. Install docker and docker-compose on the RPi like this:
sudo apt-get install docker docker-composeI recommend using docker-compose to manage the container from the command line. The installation instructions (for Reactor on docker) give you a template docker-compose configuration file you can just copy-paste. It makes starting the Reactor container much less verbose, and it basically manages itself once started (including restarting at boot). Upgrades are this easy:
docker-compose down     # stop Reactor
docker-compose pull     # pull updated Reactor image
docker-compose up -d    # restart Reactor on new image
I guess you could also install Portainer for a GUI to manage docker, but I think that's more complicated. Put the three lines above in a script file and run it whenever you need to.
I would also recommend installing Geany if you plan on using the desktop GUI. It's a very easy programmer's text editor that does syntax highlighting, so it will help you make correct changes to Reactor's YAML configuration files, shell scripts, etc.
-
No, a Pi 2 won't do it. Well, you probably could, but I don't recommend it and I haven't tried it. A 3B+ is workable. I've tested that, so that's the safest minimum I can recommend.
I've had trouble getting Pis as well for multiple projects, but I recently found rpilocator.com and I can highly recommend it. If you follow them on Twitter you can basically get alerts from them and it helps. You need to be quick. Yesterday they reported over 100 units available from a popular US seller, and today that seller is reported out of stock.
I recently managed to get a Compute Module 4 with 8GB EMMC (built-in Flash storage like an SSD). That ran me US$45 for the CM4, and another $40 for the I/O board on which you mount it. I am testing that right now, and will likely use it as my build system for 64-bit Raspbian Bullseye releases (coming soon). It's much tidier than fussing with the USB-SATA adapter. That is all equivalent to a 4B+ in power, and may be equivalent or even a little lower in price -- by the time you've purchased a Pi 4B+ with 2GB RAM, an 8GB or larger SSD, and the USB 3.1 to SATA interface, you're in the same price range. Either way you go, the investment is a computing platform you can use for a long time; they've got good power, are well-built little boards (all), etc.
Also, for any configuration with less than 2GB RAM, I recommend using the "Lite" version of the OS install (no desktop/GUI, command line only). That would include the 3B+.
I want to add that I've been using a (Raspberry Pi) Compute Module 4 with 8GB EMMC on board (and no Wi-Fi), mounted on the RPi CM4 I/O Board, and it's a great combination and alternative. I mentioned that earlier in this thread when I first got it, and now it's been about six weeks and I've got some experience with it. The overall cost was comparable to the RPi 4B+ maker/consumer board with an added SSD and USB3.1 interface (around $45 for the CM4 and $40 for the I/O board, so US$85). The CM4's are more available right now (still hard to get, but much easier than the maker board) because RPi is giving manufacturing priority to CM4 to support industry. The I/O boards are easy to get and always have been. The I/O board offers two on-board HDMI interfaces, a PCIe (x1) ssocket (for many things, like another way to get storage), a gigabit Ethernet port, two USB 2.0 connectors (hmmmph, rather see 3.x), microSD socket (for non-EMMC models), two camera connectors, two display connectors, 28 x GPIO, and a battery-backed real time clock. You can power it with a 12VDC power supply (2.1mm positive tip barrel connector), so it's easy to get the power in that the board really needs, and on a connector I regard as more stable and durable for that purpose than USB micro. It also offers a Berg-style power connector for use with, for example, a small (MeanWell) switching PSU. It has a USB micro connector for connecting to a PC, where the system then looks like a Flash drive so you can do updates or make filesystem changes on a cold system.
Below are a couple of photos of my rig in a case I designed in Fusion 360 and 3D printed.
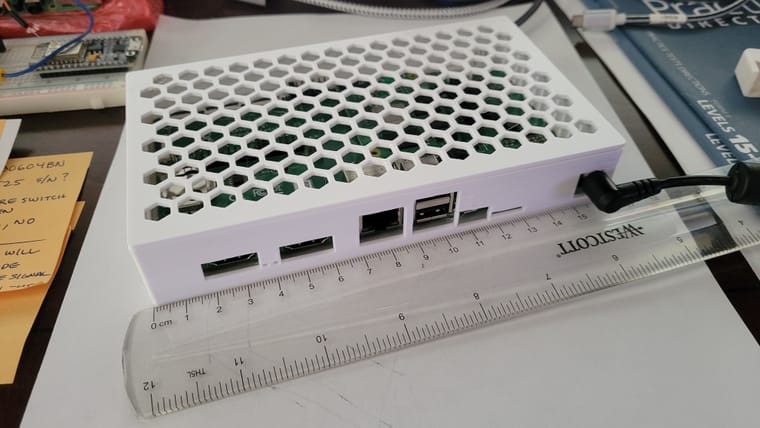
It's a bit (1-2cm) smaller than a Vera Plus in every dimension; for non-Vera readers, that's about the size of many 4-port Ethernet switches and small routers. It's fanless, and so far, I haven't seen the need for anything other than passive/convective cooling. But I will be adding heat sinks to the CM4, just for more headroom. The I/O board has a standard four-pin fan connector that works from the 12VDC supply.
What I especially like is that the eMMC storage is bus-connected to the CPU on the same card, so it's much faster than either MicroSD or SSD-over-USB. I haven't tested PCIe storage yet. The CM4 configuration is also much less fragile. I find the USB interface cable necessary for the SSD on the maker board setup to be unwieldy to cable manage, and I've learned not to move it at all when running or I'll cause disk faults and a kernel crash (i.e. it looks and acts like cobbled together bits, where the CM4+I/O looks purpose-built). The real time clock is also great to have; many of you may remember from Those Other Forums that I am firmly of the opinion that no serious IoT platform can be built without one (so that the time is very close to correct when the system cold boots after a power loss and network time is not yet available, and thus time-bsed automations don't go crazy due to a reset/default clock).
I highly recommend this approach to anyone. For CM4 configuration, I think the 2GB RAM/8GB eMMC (MSRP US$40 without Wi-Fi, US$45 with) is good for just a basic Reactor host, but the filesystem may end up a little tight if you also want to run Hass, InfluxDB, etc. (the OS itself takes almost half of my 8GB with the desktop GUI installed). I would go up to 16GB or 32GB eMMC for those, and 4GB RAM. The maximum manufactured configuration is 8GB RAM and 32GB eMMC, with an MSRP of US$90/95 without/with Wi-Fi. Run it on the 64-bit version of Raspbian Bullseye. Unless you have some reason to want Wi-Fi, I'd save the US$5 — running your IoT automations on Wi-Fi as primary network interface is not a good idea (IMO); the I/O board's gigabit Ethernet port is The Way. Full specs for the CM4 are here, and for the I/O board here.
Just so I've said it, I don't think the maker board configuration is bad at all, it's just in a close second place for me right now (because of the form factor issues and the real time clock). Six weeks ago I didn't have enough experience with the CM4 to declare it my favorite, but as of right now, that's where it is. But I would in no way shy away from the maker board or recommend against it. I've seen some tidy rigs put together with easily-printed cases for the maker board with an SSD, and some clever right-angle USB connectors to ease the USB cabling issue. But if you're comparing cost and convenience of the two configurations, I now think the CM4+I/O configuration edges out the maker board. The best configuration for you is the one you find most agreeable, always.
-
@talisker said in Cheapest platform on which to run MSR:
I was thinking of using (installing?) a Docker so that I can install other applications too, but would this be too much to bite off for a beginner?
I recommend it. It takes away a lot of details. Install docker and docker-compose on the RPi like this:
sudo apt-get install docker docker-composeI recommend using docker-compose to manage the container from the command line. The installation instructions (for Reactor on docker) give you a template docker-compose configuration file you can just copy-paste. It makes starting the Reactor container much less verbose, and it basically manages itself once started (including restarting at boot). Upgrades are this easy:
docker-compose down     # stop Reactor
docker-compose pull     # pull updated Reactor image
docker-compose up -d    # restart Reactor on new image
I guess you could also install Portainer for a GUI to manage docker, but I think that's more complicated. Put the three lines above in a script file and run it whenever you need to.
I would also recommend installing Geany if you plan on using the desktop GUI. It's a very easy programmer's text editor that does syntax highlighting, so it will help you make correct changes to Reactor's YAML configuration files, shell scripts, etc.
@toggledbits said in Cheapest platform on which to run MSR:
I guess you could also install Portainer for a GUI to manage docker, but I think that's more complicated
@toggledbits, more complicated is an understatement.
I'd like to hear from anyone who has done this and not experienced difficulties, I've been able to run either (Reactor or Portainer) but not both in Portainer Container. Over to the experts..... -
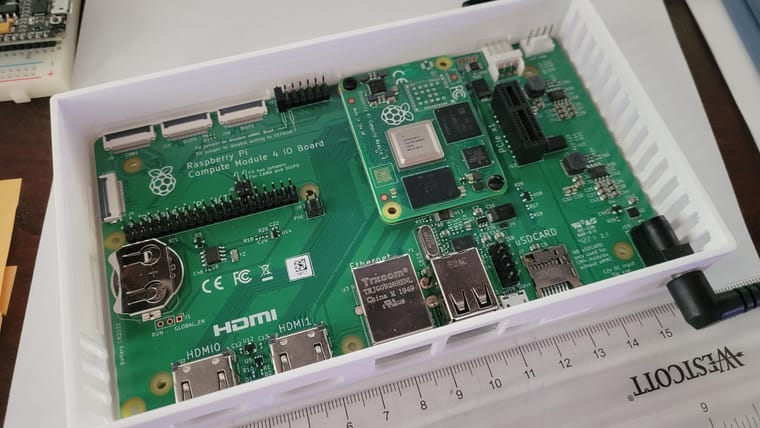
I want to add that I've been using a (Raspberry Pi) Compute Module 4 with 8GB EMMC on board (and no Wi-Fi), mounted on the RPi CM4 I/O Board, and it's a great combination and alternative. I mentioned that earlier in this thread when I first got it, and now it's been about six weeks and I've got some experience with it. The overall cost was comparable to the RPi 4B+ maker/consumer board with an added SSD and USB3.1 interface (around $45 for the CM4 and $40 for the I/O board, so US$85). The CM4's are more available right now (still hard to get, but much easier than the maker board) because RPi is giving manufacturing priority to CM4 to support industry. The I/O boards are easy to get and always have been. The I/O board offers two on-board HDMI interfaces, a PCIe (x1) ssocket (for many things, like another way to get storage), a gigabit Ethernet port, two USB 2.0 connectors (hmmmph, rather see 3.x), microSD socket (for non-EMMC models), two camera connectors, two display connectors, 28 x GPIO, and a battery-backed real time clock. You can power it with a 12VDC power supply (2.1mm positive tip barrel connector), so it's easy to get the power in that the board really needs, and on a connector I regard as more stable and durable for that purpose than USB micro. It also offers a Berg-style power connector for use with, for example, a small (MeanWell) switching PSU. It has a USB micro connector for connecting to a PC, where the system then looks like a Flash drive so you can do updates or make filesystem changes on a cold system.
Below are a couple of photos of my rig in a case I designed in Fusion 360 and 3D printed.
It's a bit (1-2cm) smaller than a Vera Plus in every dimension; for non-Vera readers, that's about the size of many 4-port Ethernet switches and small routers. It's fanless, and so far, I haven't seen the need for anything other than passive/convective cooling. But I will be adding heat sinks to the CM4, just for more headroom. The I/O board has a standard four-pin fan connector that works from the 12VDC supply.
What I especially like is that the eMMC storage is bus-connected to the CPU on the same card, so it's much faster than either MicroSD or SSD-over-USB. I haven't tested PCIe storage yet. The CM4 configuration is also much less fragile. I find the USB interface cable necessary for the SSD on the maker board setup to be unwieldy to cable manage, and I've learned not to move it at all when running or I'll cause disk faults and a kernel crash (i.e. it looks and acts like cobbled together bits, where the CM4+I/O looks purpose-built). The real time clock is also great to have; many of you may remember from Those Other Forums that I am firmly of the opinion that no serious IoT platform can be built without one (so that the time is very close to correct when the system cold boots after a power loss and network time is not yet available, and thus time-bsed automations don't go crazy due to a reset/default clock).
I highly recommend this approach to anyone. For CM4 configuration, I think the 2GB RAM/8GB eMMC (MSRP US$40 without Wi-Fi, US$45 with) is good for just a basic Reactor host, but the filesystem may end up a little tight if you also want to run Hass, InfluxDB, etc. (the OS itself takes almost half of my 8GB with the desktop GUI installed). I would go up to 16GB or 32GB eMMC for those, and 4GB RAM. The maximum manufactured configuration is 8GB RAM and 32GB eMMC, with an MSRP of US$90/95 without/with Wi-Fi. Run it on the 64-bit version of Raspbian Bullseye. Unless you have some reason to want Wi-Fi, I'd save the US$5 — running your IoT automations on Wi-Fi as primary network interface is not a good idea (IMO); the I/O board's gigabit Ethernet port is The Way. Full specs for the CM4 are here, and for the I/O board here.
Just so I've said it, I don't think the maker board configuration is bad at all, it's just in a close second place for me right now (because of the form factor issues and the real time clock). Six weeks ago I didn't have enough experience with the CM4 to declare it my favorite, but as of right now, that's where it is. But I would in no way shy away from the maker board or recommend against it. I've seen some tidy rigs put together with easily-printed cases for the maker board with an SSD, and some clever right-angle USB connectors to ease the USB cabling issue. But if you're comparing cost and convenience of the two configurations, I now think the CM4+I/O configuration edges out the maker board. The best configuration for you is the one you find most agreeable, always.
@toggledbits said in Cheapest platform on which to run MSR:
I want to add that I've been using a (Raspberry Pi) Compute Module 4 with 8GB EMMC on board
Way to go, unfortunately for me, the CM4 I/O board is the only part available. The Compute Module 4 is OOS (all versions), sigh.....
BTW, I love the case.....makes it all look very professional.aka Zedrally
-
@toggledbits said in Cheapest platform on which to run MSR:
I want to add that I've been using a (Raspberry Pi) Compute Module 4 with 8GB EMMC on board
Way to go, unfortunately for me, the CM4 I/O board is the only part available. The Compute Module 4 is OOS (all versions), sigh.....
BTW, I love the case.....makes it all look very professional.@black-cat said in Cheapest platform on which to run MSR:
The Compute Module 4 is OOS
It's terrible right now, for sure. Just a reminder, rpilocator.com may be helpful. I'm asking him if he can add AU/NZ vendors, but I see PiAustralia has starter kits available (not just board, but a kit with a board). Pricey, but if you must have, maybe worth the premium.
For anyone it helps, it appears Semaf in Austria has stock of RPI 4B 2GB at the moment, and has since last night.
Update: Core Electronics (AU) also has the starter kit and the desktop kit in stock, and both come with a Pi 4 board.
-
If anyone is interested, I've published my model for the Compute Module 4 case on printables.com.
-
@black-cat I run Reactor and Portainer on a Pi4 without any issues.
The Pi is running Node-Red (bare metal), and in Docker: Teslamate (includes Teslamate, Grafana, Traefik, PostgreSQL, MQTT), Reactor (includes InfluxDB for Reactor, Chronograf, Telegraf), Gotify (a self-hosted notification platform), and a Tesla Powerwall integration (includes 2nd instances of Telegraf and InfluxDB, Grafana, and pypowerwall). Fifteen containers when you add Portainer itself. The Portainer GUI makes this all much easier to manage.
